
Just like with any goodbye, teachers eventually have to let their students go. With combined guidance, patience, and instructions, you can help them learn to stand on their two feet. This is the core idea behind the gradual release of responsibility model. It equips your students to carry what they’ve learned into real-world situations beyond the classroom.
First introduced by F. David Pearson and Margaret C. Gallagher in 1983, the gradual release of responsibility follows a three-step approach to shift learning from teacher to student. In simple terms, it’s “I Do, We Do, You Do.” This structure highlights how shared responsibility is a key part of the learning process.
It may seem deceivingly simple, but it takes careful and intentional planning. After all, building real independence is no easy feat. But when done right, it gives your students the necessary confidence and skills to take ownership of their learning and choices.
Ready to dive in? Let’s take a closer look at some strategies you can use for implementing gradual release of responsibility in your classroom.
| Stage | What It Looks Like | Teacher’s Role | Tools/Strategies |
|---|---|---|---|
| Model the Learning | Teacher models thinking, language, and behaviors. | Demonstrate, explain, and show examples. | Think-alouds, noticing, and ClassPoint’s Word Cloud |
| Guide with Instructions | Students begin participating with scaffolding and prompts. | Assessments, peer teaching, and real-world application tasks | Think-pair-share, open-ended questions, and ClassPoint’s Short Answer activity |
| Collaborative Learning | Students work in groups to apply learning through tasks or projects. | Facilitate, observe, and prompt deeper thinking. | Group projects, presentations, and ClassPoint’s Name Picker Wheel |
| Independent Practice | Students apply learning on their own through performance tasks. | Step back and assess understanding and autonomy. | Assessments, peer teaching, real-world application tasks |
1. Set the Example Through Modeling
Students naturally look to their teachers as models, so everything starts with you.
Begin by clarifying the purpose behind what you’re teaching. This purpose should anchor your lessons and be clearly linked to your learning outcomes. When students understand the why, they are more likely to stay engaged and focused. Once that foundation is set, model the thinking, language, and behavior needed for academic success.
To do this effectively, use strategies like think-alouds and noticing. In a think-aloud, you verbalize your thought process as you explore a concept or solve a problem, showing students how to work through challenges.
If you’re using PowerPoint, direct add-ins like ClassPoint can help you back this up by using presentation tools without having to leave slide show. With a special toolbar, you can do annotations with live inking, drag & drop elements across your slides, and even pull up templated whiteboards to present key points anew.
Noticing, on the other hand, is about paying attention to where students hesitate or struggle. It helps you identify which area needs more support and what part should be reinforced. Together, these strategies make your modeling more intentional, responsive, and impactful.
2. Guide Students with Instructions
After modeling, the next step is guided instruction. In this phase, students begin to engage more actively with your academic material while you provide scaffolding for guidance. Through a series of targeted questions, prompts, and cues, you help them process information and start applying it, reinforcing gradual release of responsibility.
This stage helps you identify misconceptions early and emphasize correct interpretations. The goal isn’t to spoon-feed them answers, but to guide your students toward discovering them on their own. Strategies like think-pair-share, open-ended questions, and collaborative tasks can help deepen their engagement.
For interactive question-and-answer sessions, try running a PowerPoint quiz for real-time gathering of student responses.
Guided instruction works best in small group settings, where you can tailor your support, observe student thinking up close, and adjust your approach as needed. This sets the foundation for a smoother transition into more independent learning in the next phase.
3. Group Students for Collaborative Learning
Now that students have built a solid understanding, it’s time to bring them together for collaborative learning. This is the “we do it together” stage, where teamwork, communication, and shared responsibility come into play.
To ensure fair and random (and fun!) grouping, you can spin ClassPoint’s Name Picker Wheel, letting you auto-pick students’ names up to 10.
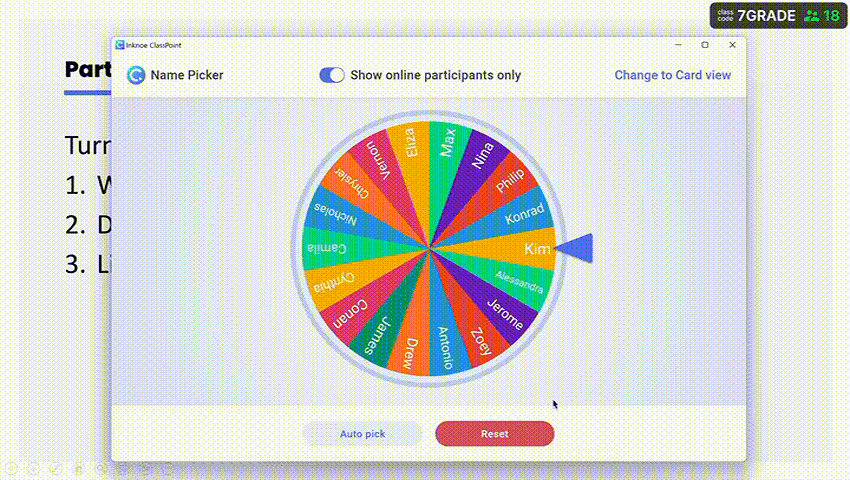
ClassPoint lets you run an exciting wheel of names right inside PowerPoint, switchable into different modes
Here's a quick guide on How to Add a Spinning Wheel of Names in PowerPoint!
In this phase, students work in teams to apply what they’ve learned. This can be achieved by creating a group project, such as a poster, skit, or presentation, that demonstrates their understanding of the lesson. As they collaborate, you take on the role of facilitator by moving around the room, listening in, and offering timely prompts or questions to guide their thinking.
If you notice any confusion or errors, avoid giving your students the correct answer right away. Instead, motivate them to revisit a key part of the lesson or re-read a specific section of the text. This gives them space to think further and problem-solve together with peers.
Collaborative learning not only helps your students consolidate their understanding but also strengthens essential interpersonal skills. Ultimately, it prepares them for the final stage, where the gradual release of responsibility culminates.
Check out this helpful rundown on How to Use ClassPoint Quizzes as a Student Collaboration Tool.
4. Let Students Perform Without Help
Now it’s time for students to demonstrate what they’ve learned, both inside and outside the classroom. At this stage, they take full responsibility for applying their knowledge without teacher assistance. This can take the form of an assessment, a presentation, teaching a peer, or simply completing the task independently.
The goal at this point is not perfection, but autonomy. Students should be able to retrieve information, apply what they’ve learned, and perform with growing confidence.
Final Thoughts: You Create the Conditions for Independence
In the gradual release of responsibility, independence is not something that happens instantly. It develops through a clear, step-by-step process where each phase builds on the one before. This structure helps ensure that students have the support they need before moving forward.
It is also important to remember that progress is not always linear. Students may shift back and forth between phases as they face challenges, clarify misunderstandings, and strengthen their understanding. These moments are part of the learning process.
As a teacher, your role is to support that journey. By guiding students early on and stepping back when they are ready, you help them grow into confident, independent learners who are capable of navigating tasks on their own.
FAQs
What is the gradual release of responsibility model?
The gradual release of responsibility is a teaching framework where the teacher slowly shifts the learning responsibility from themselves to the students. It typically follows four phases: I do, We do, You do together, and You do alone.
Why is the gradual release of responsibility important in the classroom?
This model ensures that students are not thrown into independent work too early. It builds their confidence and understanding step by step, resulting in deeper learning and stronger retention.
How does guided instruction fit into the gradual release of responsibility?
Guided instruction is the second phase in the gradual release of responsibility. It allows teachers to support students through targeted questions, cues, and prompts while they begin to engage more actively with the content.
Can the gradual release of responsibility be used across all grade levels and subjects?
Yes. The gradual release of responsibility is a flexible framework that works across different subjects and age groups. It can be adapted to fit early education, secondary classrooms, and even adult learning environments.
How can technology support the gradual release of responsibility?
Technology can enhance each stage of the gradual release of responsibility by providing interactive tools for modeling, platforms for collecting student responses during guided practice, and digital spaces for collaborative or independent tasks. It also allows for real-time feedback and flexible ways to differentiate instruction based on student needs.
