
Maybe you are new to running a retrospective or maybe you thought retrospectives were only for agile project management, but I’m here to tell you that retrospectives are easy to run and extremely helpful across all departments, projects, and teams that are big and small.
At ClassPoint, we understand the importance of sprint retrospectives and believe that a well-structured and collaborative retrospective process is crucial for fostering continuous improvement within our teams.
Whether you’re leading a small startup or managing a large enterprise, regular retrospectives provide an opportunity to reflect on past projects, identify areas for improvement, and foster a culture of learning and growth within your team. Let’s dive into the basics of a retrospective, key steps on how to run a retrospective, and tips on running a highly effective session that yields actionable insights and drives positive change.
What is a Retrospective
A retrospective is a team meeting that takes place at the end of a project or a period of time, with the purpose of assessing performance, successes, and failures.
Purpose & Benefits of Running a Retrospective
The idea behind a retrospective, or “retro” is to reflect on past experiences, learn from them, and adjust future behaviors to increase efficiency, effectiveness, and productivity.
While sprint retrospectives are rooted in Agile product development, they are very beneficial to all types of teams in any industry. When done effectively, retrospectives can be a powerful tool for improving team dynamics, communication, and overall performance. You can use these retrospectives for reflecting on anything: sprints, projects, company goals, etc. & use for check-in/check-out sessions, team building, Energizers etc.

Types of Retrospectives
Retros can take many forms and go by many names. Whether you’re conducting a sprint retrospective, project retrospective, or product retrospective, the goal is the same: to reflect on:
- What went well
- What didn’t go well
- How you can improve in the future
Retrospective Formats
The fun thing is those three main retrospective questions come in so many different forms that you can choose from! All share the same objective, but each with its own unique way of guiding your team’s conversation. Here are a few popular retro formats:
- Basic: What went well? What didn’t? What can we improve?
- The 4 Ls: Liked, Learned, Lacked, Longed For
- Start, Stop, Continue
- One word retrospective: Team members reflect and share feedback, opinions, and answer the basic retrospective questions using a single concise & intentional word.
- Sailboat: What are winds pushing us forward? What are anchors holding us back? And what rocks (obstacles) might we encounter along the way?
- FLAT: Future Directions, Lessons Learned, Accomplishments, Thank You’s
- Rose, Bud, Thorn
- Glad, Sad, Mad
- Traffic lights
- the list goes on!
Steps on How to Run a Retrospective
Step 1: Prepare your Retrospective Tools
The first step to running an effective retrospective meeting is to prepare your tools for keeping track of team opinions and discussion insights. You may find it most helpful to create a visual summary to help you & participants map out ideas, see how different insights relate to one another, and highlight areas where you can take immediate action.
There are a variety of tools you can use to facilitate a retrospective, and you can likely make do with the tools you already have! Such as:
1. PowerPoint:
For a well-prepared and interactive meeting, you can simply use PowerPoint to run a retrospective, a tool you already have & know. Plus, by using an audience interactive add-in you can embed polls and questions that your team can respond to. This can be a great way to get people engaged, crowdsource ideas, and collect real-time feedback, and present that data for discussions.
2. Physical Whiteboard & sticky notes:
If your meeting is 100% in person, you could just consider using a physical whiteboard or flipchart to capture ideas and feedback. Sticky notes can be a useful tool for group participation & organizing thoughts and ideas, allowing participants to move them around and group them into themes. Only downside is manually documenting the team feedback afterwards.
3. Digital whiteboard:
Or, maybe you want to consider digital whiteboard tools like Microsoft Whiteboard or Miro, which allow participants to collaborate in real-time. You can also use online templates specifically designed for retrospectives, which provide a structured format and make it easy to capture and organize feedback.
Step 2: Set a Time & Agenda
After deciding to hold a retrospective meeting, the next step is to set a time and agenda. First choose a helpful & appropriate time to run a reflective retro, then choose a time when everyone on the team can attend and actively participate. Once the time has been set, it’s important to create a clear and concise agenda.
The agenda should include a brief introduction to the retrospective meeting, the main goals and objectives of the meeting, the time allocated for each topic, and who will lead each discussion. This should also include which retro format or questions you want addressed.
This should be shared with all team members beforehand, so everyone knows what to expect during the meeting. A well-planned agenda sets the foundation for a productive & focused retrospective.
Step 3: Establish Ground Rules & Expectations
Before diving into the retrospective meeting, it is important to establish ground rules and expectations for everyone involved. This helps ensure that the meeting stays focused, productive, and respectful. You set your goals & following guidelines, but here are some you can consider:
- Encourage open & respectful communication: Foster a respectful environment where everyone has a chance to express their thoughts without interruptions. Encourage team members to share honest thoughts, to actively listen, and to have an open-minded attitude.
- Keep it relevant: To make the meeting efficient and effective, ensure that the conversation stays focused on the goals and objectives of the retrospective. Clearly establish the scope of the discussion and avoid delving into unrelated issues or past events.
- Keep it objective, not personal: Remind participants that the retrospective centers around evaluating workflows, situations, and systems, rather than individual actions. Emphasize the importance of separating personal feelings from the discussion.
- Embrace feedback as a positive tool: Everyone involved should be open to receiving feedback, as this is an essential part of a retrospective. Encourage a forward-looking approach, to take constructive feedback in a positive manner, and consider implementing changes that could benefit the team in the future.
Step 4: Start by getting everyone actively engaged & involved
To get everyone turned on and ready to participate, kickstart the meeting by getting everyone involved at the start. This is especially important when you have remote team members who may be less engaged due to distance. So, how do you ensure everyone is present and engaged from the very beginning?
Start with an warm-up interactive activity or ice breaker that will compel everyone to actively contribute to the meeting.
This could be a fun icebreaker game such as a would you rather question like “Would you rather never use social media again or never watch another movie or TV show?” or a bad joke contest having everyone submit their corniest joke and vote on the worst (best) one.
Or it could be a warmer to the retro to get everyone ready and comfortable to share such as running a poll asking everyone to rate how the month/project/agenda has been going or describe their experience in one word using a word cloud. Either or both are great ways to get everyone ready for an open & active team reflection.
Step 5: During the meeting: Run through what went well, what didn’t, and how you can improve
Now that you have set the stage and prepared the team, it’s time to dive into the meat of the retrospective and run, well, the retrospective!
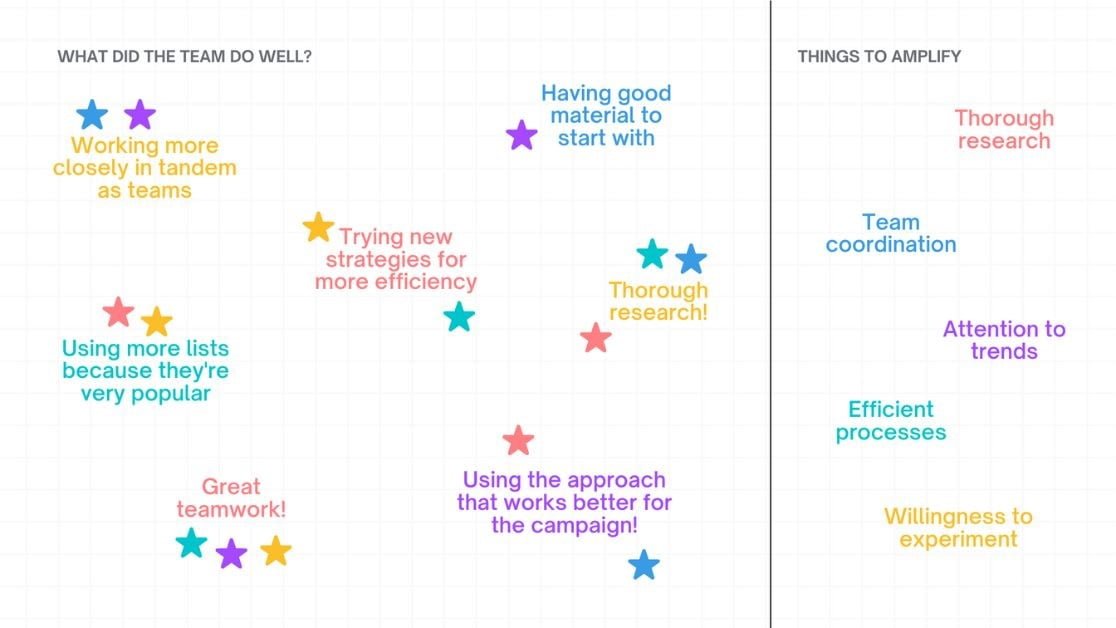
First, invite everyone to share their feedback openly by answering your retro questions and visually displaying them. It is best if everyone can contribute their opinions on their own before the floor is opened for discussion. Using a collaborative whiteboard or audience response collectors like ClassPoint is easiest.
Then using a visual display of everyone’s submitted ideas, it’s time to discuss them!:
What went well
When discussing what went well, encourage everyone to share their successes and accomplishments during the sprint or project. This exercise helps to boost morale and acknowledges everyone’s contributions.
What didn’t go well
On the other hand, discussing what didn’t work requires more tact and diplomacy. Ensure that everyone has a chance to express their thoughts without any judgment or defensiveness. Remember that the goal is to come up with solutions and improvements, not to place blame.
How you can improve in the future.
Finally, steer both the positive and constructive feedback into the future by discussing how the project or topic of discussion can be improved. This should be an open conversation, where all ideas on how to improve are welcome and recorded. This can range from tweaking specific steps or strategies to a complete overhaul of the entire process.
It can be helpful to provide any relevant data or observations to as context for the discussion. This could include metrics, customer feedback, results, or notable events.
Step 6: Identify common themes & insights
Once you’ve collected each team member’s input, it’s time to look for patterns. Use whichever visual summary tool you’ve opted for to help you keep track of everyone’s ideas, and map out the various themes, commonalities, or issues that emerge from the discussion. Taking secondary notes of these trends and discussion insights can help you identify the most significant challenges and opportunities for improvement. Once you’ve identified these common themes, you can start to formulate specific action items that address the root causes of these issues.
Step 7: Create an action plan
The final step and one of the most important ones in running an effective retrospective is to create an action plan that will address the issues and concerns that have been identified during the meeting. It is important to ensure that everyone has agreed on the actions to be taken and that they are realistic, achievable, and measurable.
The action plan should outline specific tasks, deadlines, and responsibilities for each member of the team. This will ensure that everyone is clear on what needs to be done and who is responsible for each task. It’s also important to set regular check-ins to ensure that the action plan is being followed through and to address any roadblocks or challenges that may arise.
Step 8: Document what was discussed
The final step of an effective retrospective meeting is to document what was discussed. It’s important to have a record of the key insights and action items so that they can be referred back to in the future.
Make sure the documentation is shared with everyone on the team, and it is available as a reference guiding action items. Check in with team members regularly to ensure progress is being made on the action items that were identified during the meeting, and adjust the action plan as needed.
Tips for Getting the Most out of Retrospectives
- Set a safe place: It’s important to set a welcoming & inclusive tone at the start of the meeting to encourage open communication and a collaborative approach. Establish a safe and open environment where teammates can feel comfortable expressing their thoughts and opinions without fear of judgement or retribution.
- Consider the context & timing of your retrospective: Carefully choose an appropriate time to run a retrospective, ideally at the end of a project or after deadlines & when your team isn’t on a crunch time.
- Avoid teammates from feeling personally attacked: Set the tone that feedback should be objective and not personal and moderate to prevent personally subjective comments or blame for mistakes or setbacks.
- Make it fun to lighten the mood & create an encouraging culture: Incorporate fun ice-breakers & activities to break up the monotony of the meeting and create a positive and encouraging work culture.
- Go into breakout sessions if your attendee count is high: Splitting up into smaller groups can help facilitate more focused and productive discussions, especially if your attendee count is high.
- Poll opinions to agree on next steps: After everyone has the open opportunity to share, make sure everyone agrees on next steps. Make it a consensus by inviting teammates to poll their opinions.
- Don’t be afraid to moderate time and plan follow-up questions: To be mindful of time constraints and ensure everyone is engaged during the retro, consider leaving more complex challenges unresolved if they need more time to solve. Ask follow-up questions to individuals involved or schedule a meeting to address that specific topic to respect the timeframe & goal of the retrospective.
- Make sure next steps & takeaways are actionable: Be sure to identify clear and actionable next steps and takeaways from the meeting to ensure that progress is made.
- Include positive reinforcement & celebrate achievements: Take the time to celebrate successes and achievements, and acknowledge and recognize the efforts and contributions of your team.
- Make retrospectives a routine: Include retrospectives as a part of your team’s routine such as every 6 weeks or after all cyclical projects. Routine retros can help ensure that the team is continually improving and that feedback is incorporated into future projects and work.
With these tips, you can effectively conduct a retrospective meeting and come up with actionable solutions that drive continuous improvement.
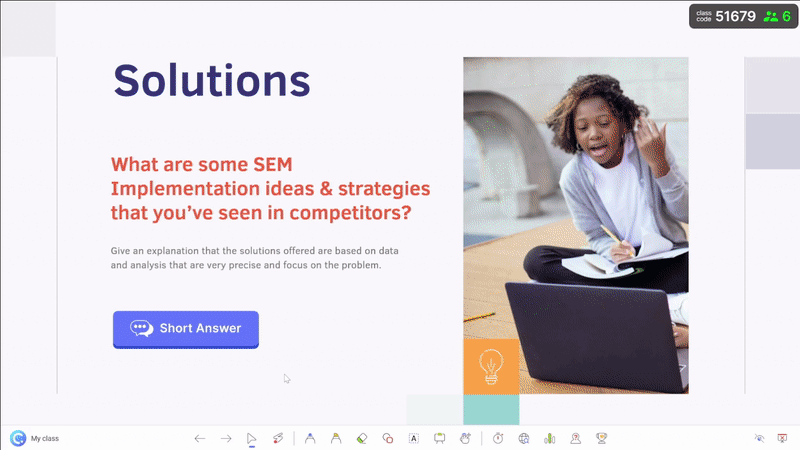
How to Run a Retrospective in PowerPoint with ClassPoint
If you don’t want to learn or purchase a new tool just to run retrospectives, you can run them right in PowerPoint! And with the addition of ClassPoint, an audience engagement tool, you can bring your teams ideas and opinions into your slideshow. Here’s How:
- Create your deck including your agenda, your retro questions, and any helpful project information for context
- Make your retro question slides interactive by adding questions and polls! Run a short answer question for each of the retrospective questions. Tip: run all your questions first, and wait to reveal the team submissions.
- One question at a time, reveal your team’s collective feedback & opinions: what went well, what didn’t, and what can be improved.
- Discuss the answers given! Insert the results as a slide to annotate on them, then open a whiteboard slide to write down the main themes & shared insights.
- End with an action plan! Use an empty Action Plan slide or blank whiteboard and decide on actionable items that can be done to improve performance and what didn’t go well in future tasks/planning/projects. Make sure everyone agrees! If your attendee count is large, run a poll to make decisions.
With ClassPoint it’s easy to turn your slides into an team involved meeting, and with audience response questions & polls and whiteboard tools added into PowerPoint, you can minimize the amount of tools used during a meeting to save on time & effort, and reduce room for tech issues.
Make sure to include a warm up or ice breaker, and end with positive reinforcement! Also make sure to follow up on the answers given and encourage discussion. This will help ensure everyone is engaged and involved, even those who may be less vocal.
Conclusion
Retrospectives are powerful tools that can help teams improve their performance, identify problems and work collaboratively to develop solutions. By taking the time to reflect on past successes and challenges, teams can gain valuable insights that they can use to improve their processes, systems, and overall performance. With the right tools and approach, you can help your team to become more efficient, productive, and successful in achieving their goals.
At ClassPoint, we believe in the power of collaboration and continuous improvement. That’s why we have developed a platform that helps teams run effective retrospectives and stay connected, even when working remotely. Our tools are designed to streamline the retrospective process, making it easier for teams to focus on what really matters – improving their performance and achieving their goals.
Try out ClassPoint in PowerPoint today!
