
Ever feel overwhelmed by a decision? We’ve all been there, whether it’s something as simple as deciding what to have for lunch, choosing the perfect vacation destination, planning a new project, or navigating a tricky situation. A decision tree in PowerPoint can be a powerful tool to visualize your options and reach a clear conclusion.
In this article, we’ll break down what a decision tree is, why PowerPoint is a fantastic tool for creating them, and then dive into three easy methods you can use to craft your own. This guide is perfect for educators structuring lesson plans, business professionals navigating strategic decisions, C-suites planning a town hall, scrum masters leading a retrospective, or anyone who wants to make well-informed choices in a structured way.
But that’s not all. Read until the end for FREE downloadable decision tree templates for PowerPoint you can use for your next presentation!
What is a Decision Tree?
A decision tree is a flowchart-like diagram that visually maps out a series of choices and their possible consequences. It uses a branching structure, starting with a central question or decision point (think “Where should I go for my holiday?”), then splitting into various options (think “beach” or ️”mountains”) and their associated outcomes (think “relaxing getaway” or “active adventure”). This clear visual representation helps you analyze problems systematically and make logical choices.
Key features of a decision tree
- The Root: This is the starting point of your tree, where the initial decision or central question needs to be made.
- The Branch: Like a tree branch stemming from the root, these represent the different options or paths you can take based on your initial decision.
- The Leaves: These represent the potential outcomes or consequences of each option you choose.
By visualizing the different paths and their outcomes, decision trees help you simplify complex situations into smaller, more manageable questions and choices. They also encourage you to think through all potential options and their consequences before making a final decision.
With a decision tree, you can make clear and informed choices using its structured framework to analyze your options and weigh the pros and cons of each path.
Why a Decision Tree in PowerPoint Shine in Presentations

Imagine you’re presenting a complex decision-making process to a team or audience. Whiteboard sketches and text-heavy documents can leave people lost in a maze of information. This is where decision trees crafted on PowerPoint come to the rescue! Here’s how they elevate your presentations:
💡 Focus and Clarity for Your Audience: Presentations are all about guiding your audience through key points. Decision trees, with their structured branching layout, do exactly that. They visually highlight the central decision, and then clearly illustrate the different options and their consequences. This keeps everyone on the same page and ensures your audience grasps the decision-making journey.
🏃 Boost Audience Engagement: PowerPoint presentations can sometimes feel passive. Decision trees, however, can spark active participation. Use them to guide discussions, pose questions at key decision points, and encourage your audience to consider different paths. This interactive element keeps your audience engaged and invested in the decision-making process.
Pro Tip: Facilitate smooth discussion among your audience by breaking them into groups. Grouping your audience allows them to come up with possible outcomes through collective brainstorming and the sharing of diverse perspectives.
🤝 Effective Communication for Complex Decisions: Complex decisions often involve multiple factors and potential outcomes. Decision trees on PowerPoint excel at untangling this complexity. By visually breaking down the decision steps and their associated consequences, you can communicate even the most intricate processes in a clear and concise manner. This is especially valuable for presenting strategic plans, project roadmaps, or troubleshooting procedures.
📊 Data Visualization: Numbers and statistics can be dry in presentations. But decision trees can help transform them! Use color coding or progress bars within your decision tree to represent data associated with different choices. This visual representation of data makes it easier for your audience to understand the impact of their decision and fosters data-driven discussions.
Pro Tip: Check your participants’ understanding of the topic by holding a quick poll right on your presentation slides. Install ClassPoint as a PPT add-in to easily conduct live polls.
By using decision trees within your PowerPoint presentations, you can ensure clear communication, foster audience engagement, and navigate complex decision-making processes with your team or any audience.
Method 1: Building Decision Tree with SmartArt Graphics
SmartArt graphics are a built-in feature in PowerPoint that provides pre-designed templates for various diagrams, including decision trees. Here’s how to leverage SmartArt for your decision tree:
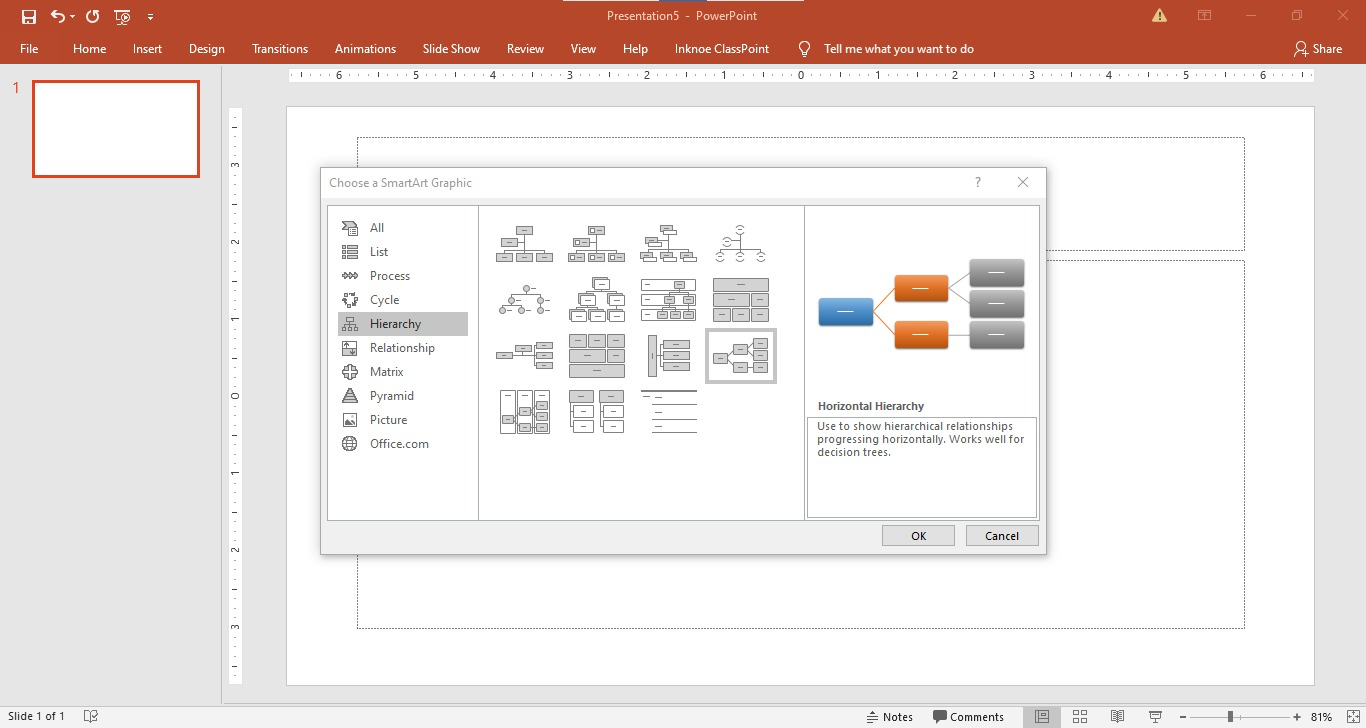
- Click the “Insert” tab, then navigate to the “Illustrations” section and select “SmartArt.”
- In the pop-up window, choose the “Hierarchy” category and pick a template like “Horizontal Hierarchy.”
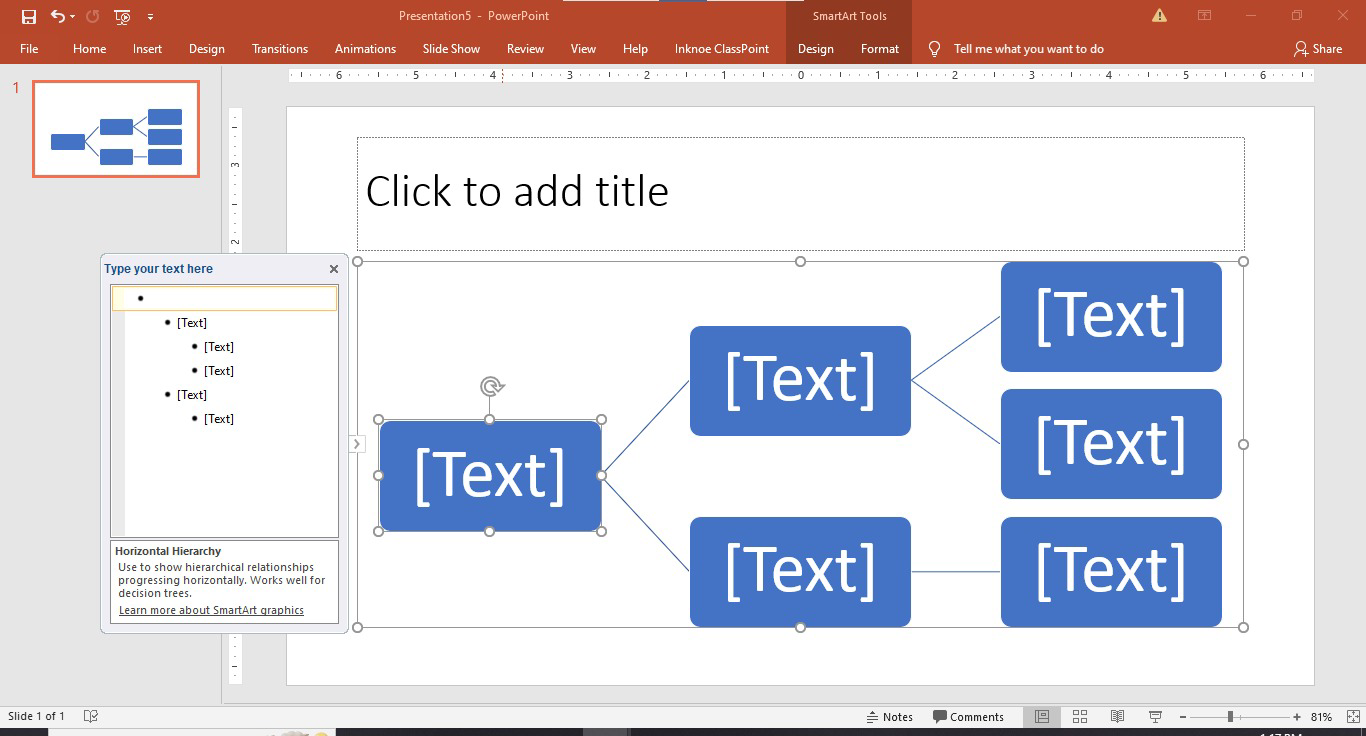
- Click on each text box within the SmartArt graphic and enter your decision points, options, and outcomes.
- Use the “Format” tab to customize the appearance of your decision tree by changing colors, fonts, and shapes.
Benefits of using SmartArt:
- Easy to use – Drag-and-drop functionality makes creating a decision tree straightforward.
- Predefined layouts – Save time by choosing from a variety of pre-designed templates.
- Automatic formatting – SmartArt automatically formats your decision tree for a clean and professional look.
Method 2: Building Decision Tree with Shapes
For those who prefer more design control, you can build your decision tree in PowerPoint entirely from scratch using basic shapes.
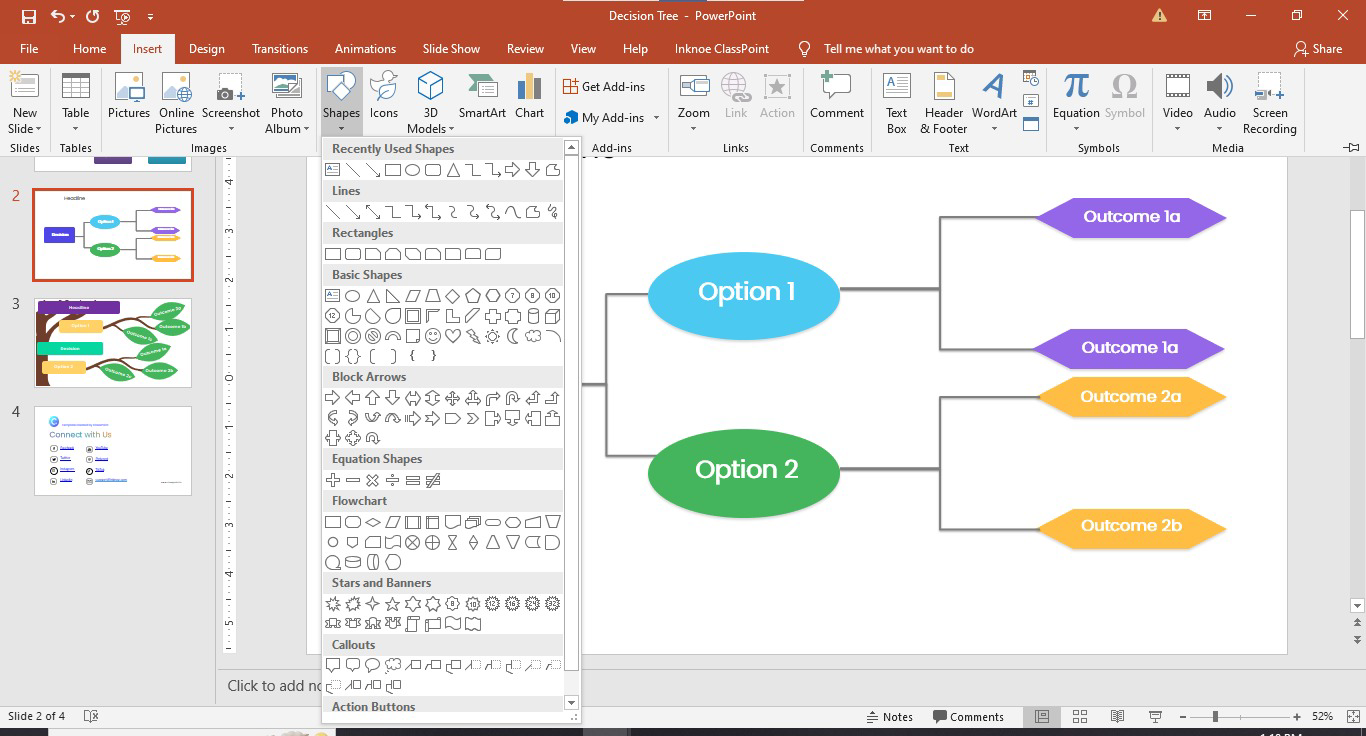
- Navigate to the “Insert” tab and select the “Shapes” menu.
- Use rectangles for decision points, ovals for options, and diamonds for potential outcomes.
- Utilize the “Format Shape” options to customize colors, borders, and text styles.
- Use the “Connector” tool (found under the “Insert” tab) to link the various shapes in your decision tree. Experiment with different connector styles (straight lines, arrows, etc.) for a clear visual flow.
Benefits of using Shapes:
- Complete design control – You have complete freedom to customize every aspect of your decision tree’s appearance.
- Flexible layout – Build a decision tree that perfectly fits your specific needs and preferences.
Customization Tip: Play with fill colors, borders, text styles or try to merge your shapes to create a visually appealing decision tree that aligns with your content.
Method 3: Interactive Drag and Drop Decision Tree
Are your presentations feeling a bit static? ClassPoint’s Draggable Objects tool can transform your decision tree from a one-way street to an interactive experience!
This powerful feature lets you create a dynamic decision tree where you can drag around the elements on your presentation slides and let your audience actively participate in the decision-making process.
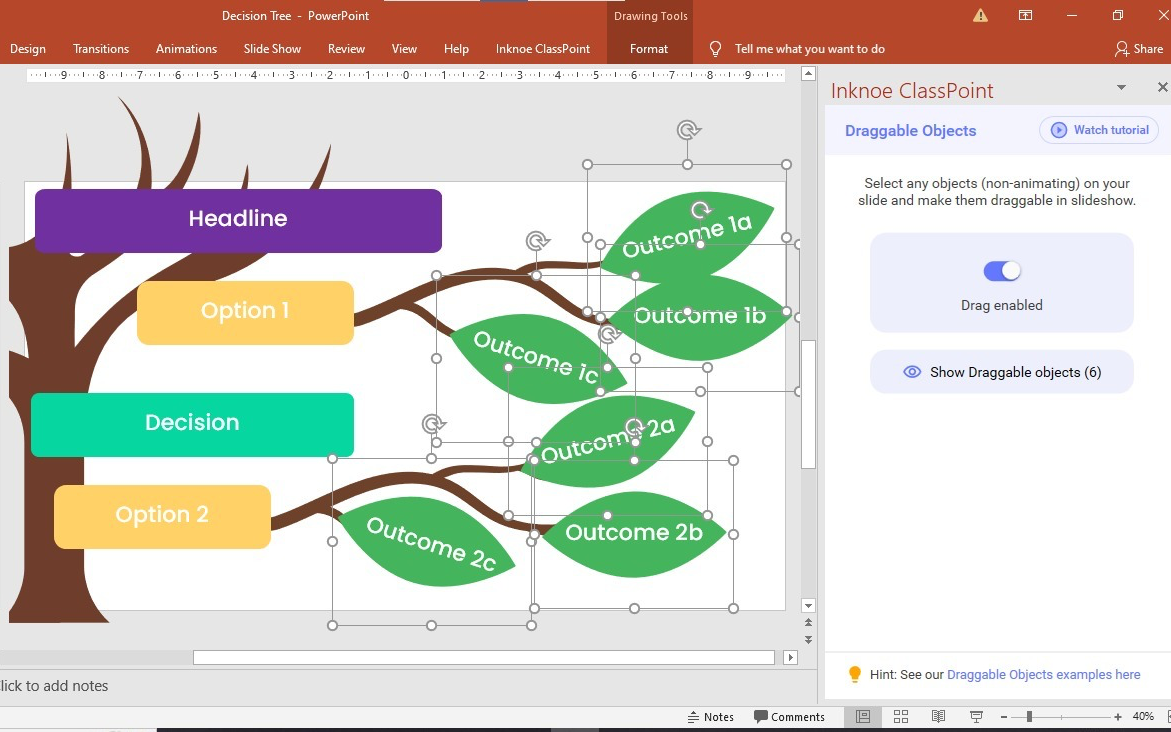
- Follow the steps outlined in either Method 1 (SmartArt) or Method 2 (Shapes) to create the foundational structure of your decision tree. You can even think outside of the box and use other shapes from the web.
- With ClassPoint installed, navigate to the “Inknoe ClassPoint” tab and select “Draggable Objects”. Choose the shapes or text boxes you used for your decision tree elements (e.g., rectangles for decision points, ovals for options).
- Once selected, toggle on the option “Make Draggable” on the side panel.
- Now, in slideshow mode, click on the “Drag” option on the ClassPoint toolbar and start moving your shapes around!

Benefits of using Draggable Objects:
- Dynamic exploration – Drag & drop lets viewers “explore” decisions, strategies, or scenarios, visualizing outcomes in a fun way.
- Increased focus & retention – Interaction grabs attention and boosts information retention.
- Real-world simulation – Simulate choices, consequences, or processes for a more immersive experience.
Learn how to master the Draggable Objects feature to unlock more interactive possibilities. Use it in your next class or meeting to skyrocket engagement!
Tips from the Experts: Make Your Decision Tree Presentations More Interactive!

While decision trees offer a powerful foundation, you can take them a step further to create a truly engaging experience for your audience. With these PowerPoint tips, you can turn static decision trees into interactive presentations that captivate your audience!
Tip #1: Leverage Built-in Presentation Tools
Built-in presentation tools allow you to annotate live on your presentation slides, draw shapes, drag objects, set up a timer, and more. Use these tools to engage your audience directly at key decision points within your decision tree. Pose questions related to specific choices, gather real-time feedback, and spark discussions that will enrich the overall decision-making process.
Tip #2: Hyperlink to Supporting Information
Don’t overload your decision tree with too much detail. Use hyperlinks within your decision tree to link to separate slides or external documents that provide more in-depth information on specific options or outcomes. This keeps your tree clear and concise while offering viewers the option to delve deeper if they choose.
Pro Tip: ClassPoint’s built-in presentation tool allows you to browse the web with its embedded browser. With it, you don’t have to exit your PowerPoint slides to look up useful information.
Tip #3: Incentives for a Decision Reached
Gamification can be a powerful tool for boosting engagement. Consider incorporating a simple reward system specifically for presentations using decision trees. Give incentives to your participants, like awarding stars, to members who actively participate in polls, ask insightful questions, or successfully navigate the decision tree to reach a decision. This playful approach adds a fun touch to encourage active participation.
Want more ideas for your next PowerPoint presentation? Check out these insanely simple ways to create venn diagrams and organization charts to give your slides a little zhuzh!
Bonus: Free Downloadable Decision Tree PowerPoint Templates!
We’ve included a decision-making tree template that you can download for free, including 3 different decision tree designs crafted with the methods above. Click below to download your template and start creating your decision trees in PowerPoint today!
Decision Tree PowerPoint Template
Create a more memorable presentation experience with interactive decision trees in PowerPoint!
Final Thoughts
There you have it – 3 super easy ways to build a decision tree in PowerPoint to help you decide on your next move, big or small. Remember, decision trees are a versatile tool applicable to various situations, from personal goal setting to strategic business planning.
Don’t forget to download our free decision tree template and start crafting your own compelling decision trees in PowerPoint today!
So, the next time you encounter a complex decision, think outside the box and start visualizing your options. Empower yourself and your audience with the clarity and visual impact that decision trees offer.
