
As an EdTech educator, you invest significant time and effort into crafting lessons that not only deliver content but also captivate and inspire your students. Imagine having a tool at your disposal that can elevate your lesson creation process, making it not just informative but truly engaging and interactive. Enter ClassPoint—the catalyst that transforms your ordinary PowerPoint presentations into dynamic and immersive learning experiences.
We will take you through ways you can enhance any PowerPoint presentations – from preparation to post-lesson review and everything in between, including adding gamification elements! Let’s get started creating a lesson with ClassPoint now!
Table of Contents
What is ClassPoint?
ClassPoint is an all-in-one interactive teaching tool that integrates right within your PowerPoint. It consists of a suite of interactive PowerPoint features ranging from presentation tools and interactive quizzes, to gamification features.
To begin using ClassPoint, start by downloading it for free from classpoint.io! Then, create and edit any PowerPoint lesson on your PowerPoint slides as you normally would, and add in ClassPoint features such as interactive quizzes, whiteboard slides, and draggable objects to turn your slides into an interactive experience. You will also gain access to an array of presentation tools and are able to gather live responses from your students. Keep reading to explore even more wonderful things you can do with ClassPoint!
Pre-Lesson Preparation with ClassPoint
Prior to teaching your lesson, efficient planning is essential. Thanks to AI and advancing technology, spending hours on lesson planning and slide design is a thing of the past. Once the initial preparation is complete, you can seamlessly incorporate interactive features to captivate your class.
Lesson Planning
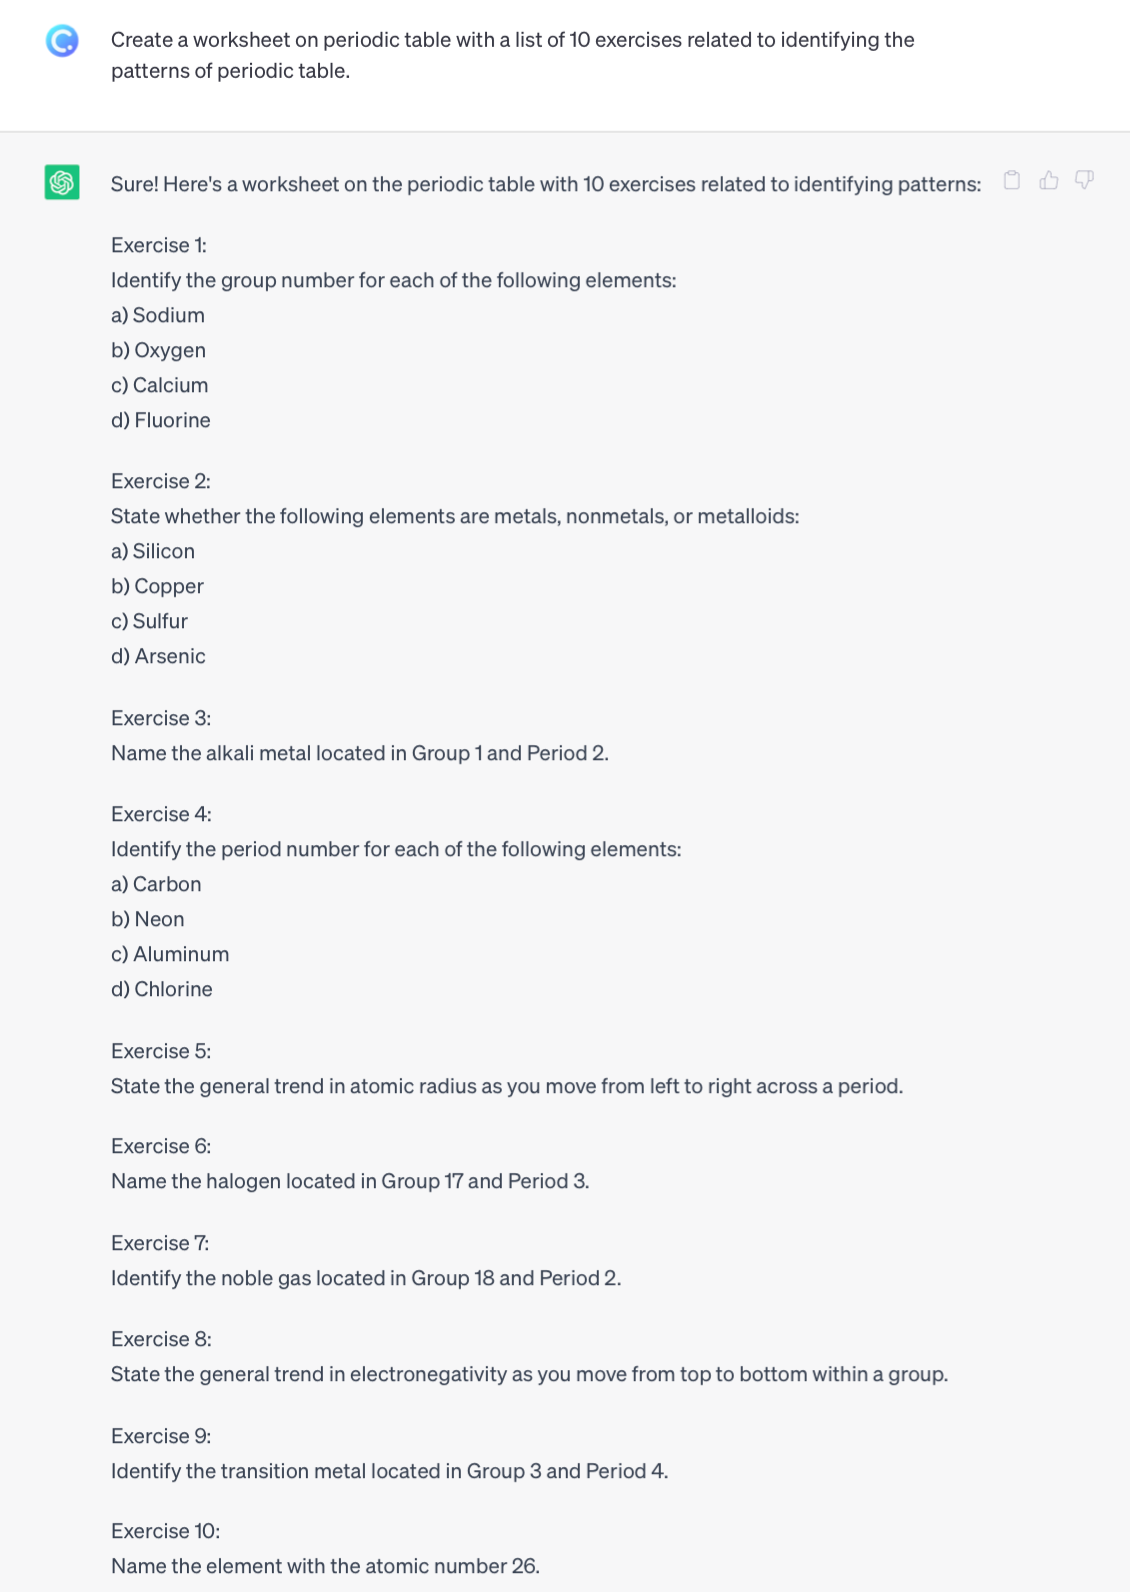
Before diving into the interactive features, let’s get started on lesson preparation. Did you know that you can leverage ChatGPT to assist in researching ideas, activities, discussion prompts, and much more? It’s a fact! ChatGPT can be a time-saver during lesson planning and can ignite creativity in your teaching approach. Here’s an example:
Create a worksheet on [topic] for students of [level] and [subject].
For a more structured approach to lesson planning, explore AI-powered lesson plan generators. These tools can craft lesson plans using existing papers, web content, or text you provide.
While strategizing your lesson delivery, consider integrating ClassPoint’s array of interactive questions, presentation tools, and gamification features. To discover specific ways to enliven your presentation using these tools, continue reading!
Slide Design and Prep
With your lesson planned, it’s time to craft the content and design of the teaching slides for your students. Developing PowerPoint presentations filled with knowledge that are simultaneously captivating and visually appealing can be time-consuming, something most teachers are short on.
Fret not as we have prepared these slide creation and design tips and tricks to help you create teaching slides in a few clicks:
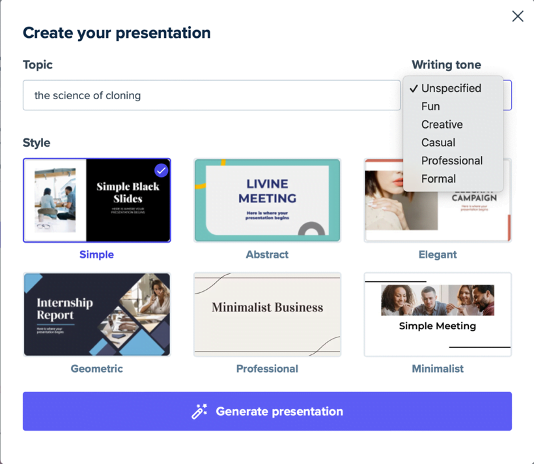
- Quickly turn your lesson plan into a PowerPoint deck using AI PowerPoint generators.
- Have ChatGPT create your slide content based on your lesson plan.
- Add animations, transitions, and hyperlinks to make your PowerPoints more visually appealing
- Add visuals and matching colors throughout your presentation easily
- Add visuals throughout your presentations with free, ready-to-use images, or ones created with AI.
Try the 11 best free AI PowerPoint generators for your next PowerPoint presentation!
Enhancing Interactivity with ClassPoint
After preparing your lesson plans and slides, it is time to elevate the interactivity of your PowerPoints for both you and your students.
Interactive Warm-Ups
Kickstart your lessons with energy and engagement by integrating interactive warm-ups through ClassPoint. These swift activities establish a positive atmosphere, stimulate students’ thinking, and ready them for the upcoming lesson.
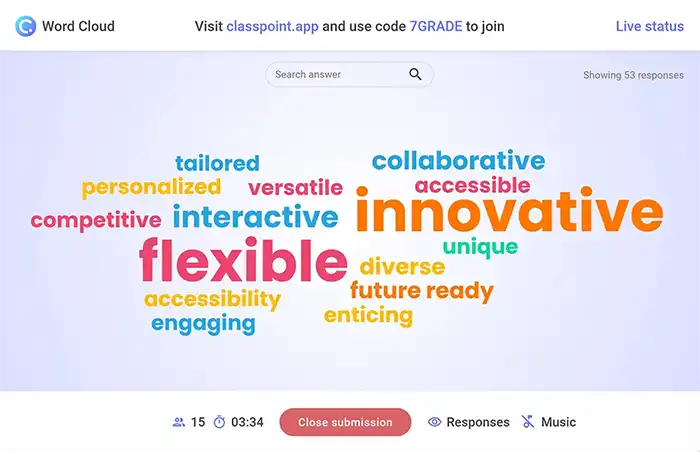
A fantastic approach to warming up students is through a brainstorming activity. Utilising ClassPoint’s Word Cloud question type, their responses contribute to a dynamic word cloud that evolves with every new input. This activity not only captivates students but also presents the results visually, fostering further discussion within the class.
Learn more about different ways to add word clouds in your lessons.
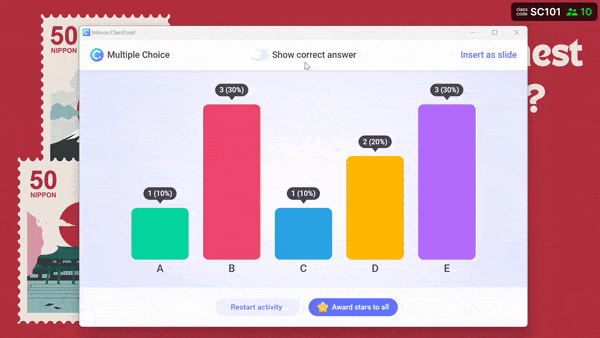
Interactive Quizzes
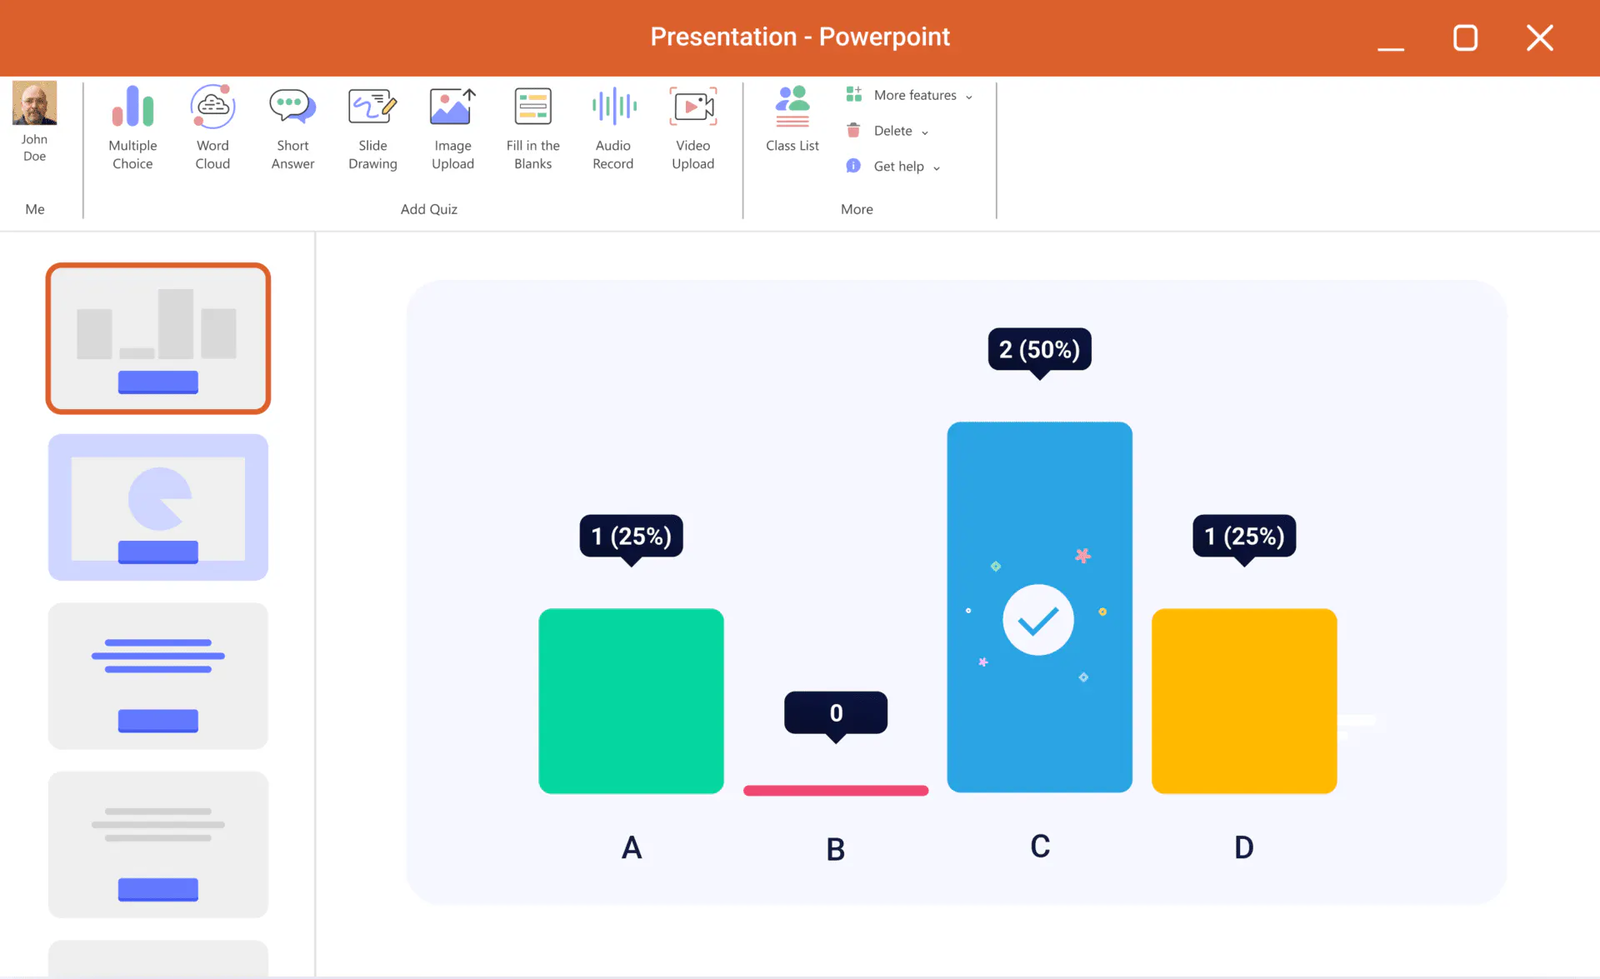
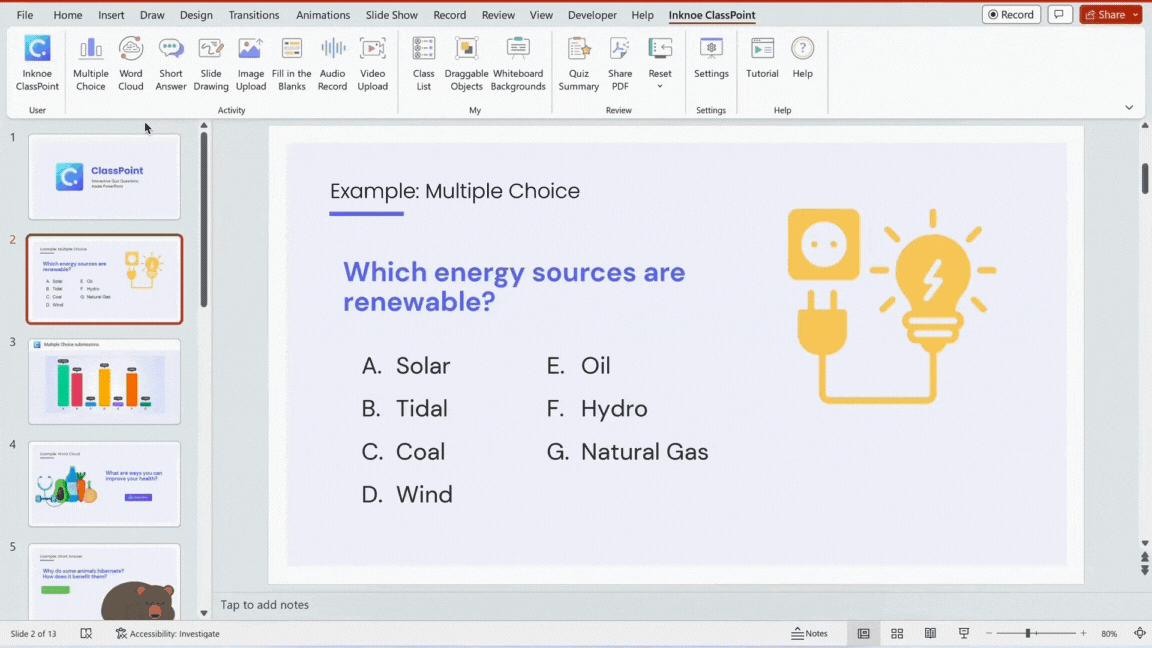
Next, enhance engagement by interspersing interactive quiz questions throughout your presentation to gather real-time feedback and assess understanding.
Simply create a slide within your presentation, insert your question text, and then click on the appropriate ClassPoint interactive quiz buttons to be added onto your slide. During your lesson, students can join your class and promptly submit their responses.
ClassPoint offers 8 diverse question types, catering to various learning styles.
Here’s how to set up an interactive quiz within your PowerPoint:
- Type out your question on your PowerPoint slide.
- Select from one of the 8 interactive quiz button types from your ClassPoint tab within your PowerPoint ribbon.
- Customize the question in the Side Panel, providing the correct answers.
- Once you enter slide show mode, students can join your class and submit their responses via classpoint.app.
Learn more about these 50 use cases on when to use each question type in your lesson.
AI-Powered Quizzes
To save time and automate quiz generation, try ClassPoint AI. This feature generates quiz questions using the content available on your slides.
Here’s how to use ClassPoint AI:
- Enter slide show mode and access ClassPoint AI from the toolbar at the bottom.
- Customize your question preferences by selecting the question type and Bloom’s Taxonomy level.
- Once generated, the question will be inserted as a slide, complete with the interactive button already in place.
Learn more about the how to automate the process of quiz generation for your lessons.
Even if your students don’t have their own devices, you can still incorporate interactivity into your PowerPoint presentations. Here’s how:
Drag and Drop Slides
ClassPoint’s Draggable Objects offer versatile applications. From sorting and labeling to revealing and matching activities, they effectively capture students’ attention and visually complement your teaching material.
Here’s how to use turn any PowerPoint elements into draggable objects:
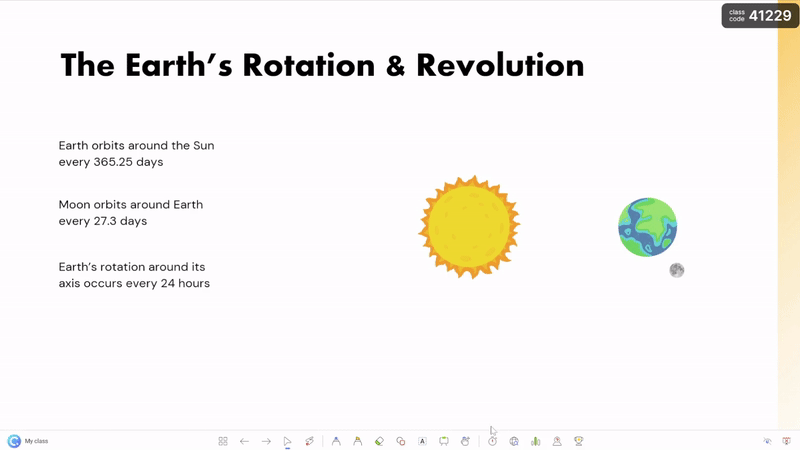
For instance, consider using Draggable Objects as a visual aid to illustrate the contrast between rotation and revolution.
- Start by inserting images of the Earth and Moon onto your slide.
- Next, select both images and activate the Draggable Objects feature via the ClassPoint tab within your PowerPoint ribbon.
- Toggle “Drag Enabled” at the side panel to make these images interactive.
- Once you entered slide show mode, select the “Hand” icon at the bottom toolbar to move the Drag Enabled objects freely during your presentation.
Learn more about the different ways you can conduct Drag-and-Drop activities in your class.
Engaging Your Class with ClassPoint
After incorporating a range of interactive tools into your presentation, elevate engagement by ensuring your students remain active participants throughout the lesson.
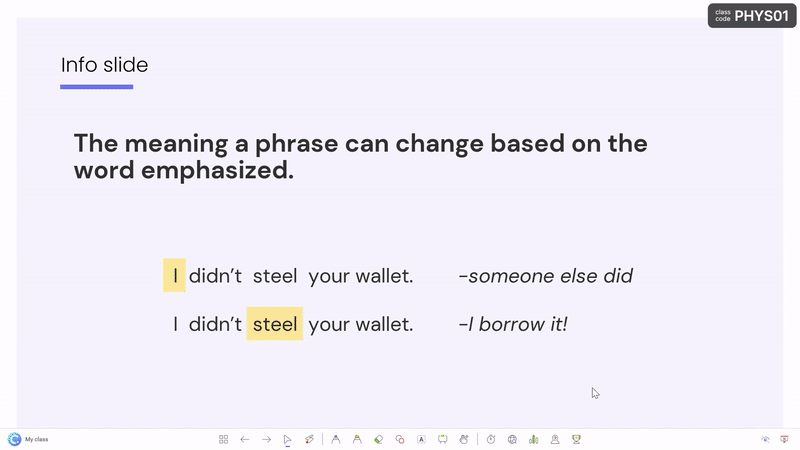
Explain and Highlight Key Points with Annotations
Maintain your class’s focus on the lesson content by utilizing an array of annotation tools. With features like the laser pen (which doubles as a spotlight!), highlighter, pen, and textbooks, you can guide their attention precisely without overwhelming annotations on your slide.
In addition, after students respond to the interactive quiz questions you created, incorporate their results as a slide to foster ongoing discussion. Utilize the annotation tools to encourage further conversation, supplement with additional information, or address any misconceptions.
Pro Tip: Enhance engagement by inserting various whiteboard backgrounds during slideshow mode. This allows you to freely annotate on pre-made templates or upload your custom designs!

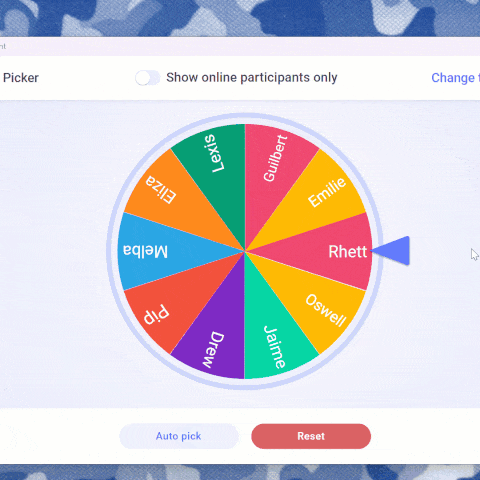
Call on Students with Random Name Picker
One of our favorite tools to keep students on their toes is the Name Picker. Rather than traditional hand-raising, employ the Spinning Wheel to randomly select any student for participation. The element of surprise in not knowing who will be chosen keeps students attentive and invested in the material.
How to Use Random Name Picker:
- Access the Name Picker icon on the ClassPoint toolbar at the bottom of your screen during slide show mode.
- Spin the wheel, select a name behind a card, or utilize Auto-Pick to choose multiple names.
Pro Tip: Ensure students have joined your class via classpoint.app or their names are added to your saved class for them to appear in the Name Picker.
Become a Name Picker expert to stay away from any favoritism, keep things fair, and captivate your class.
Looking for alternatives? Try these top 8 free Random Name Pickers for educators.
Quick Group Discussions
Following interactive quiz questions, initiate a group sharing activity such as Think-Pair-Share. This method fosters peer-to-peer learning, encourages diverse perspectives, and amplifies active engagement among students.
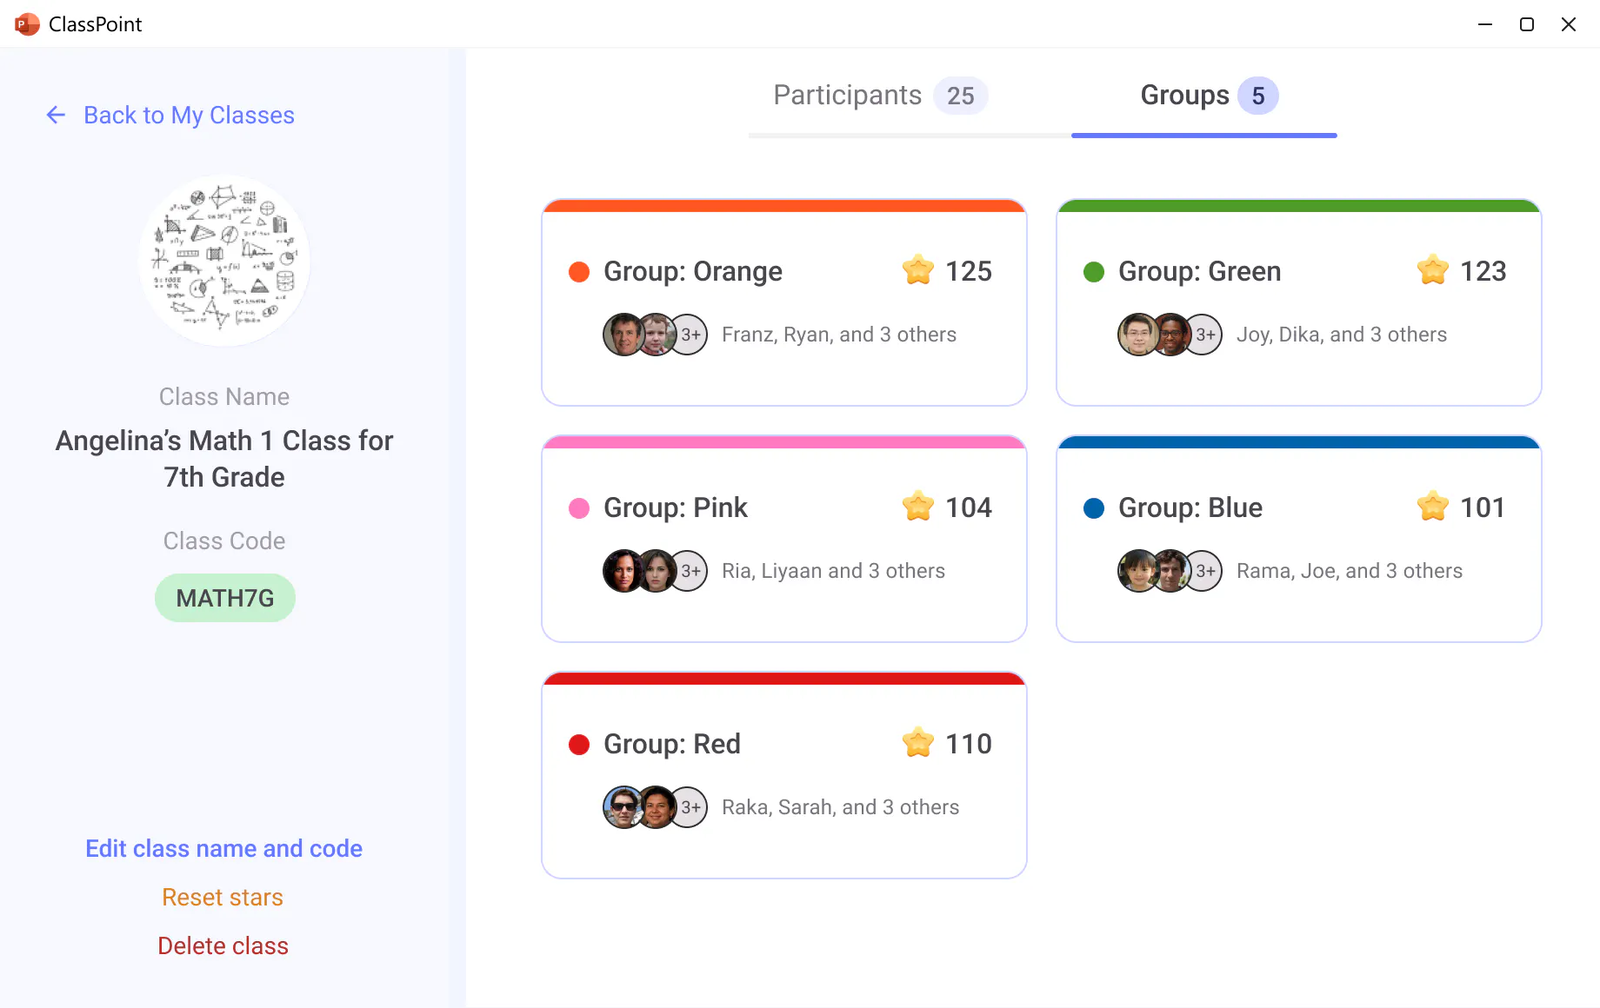
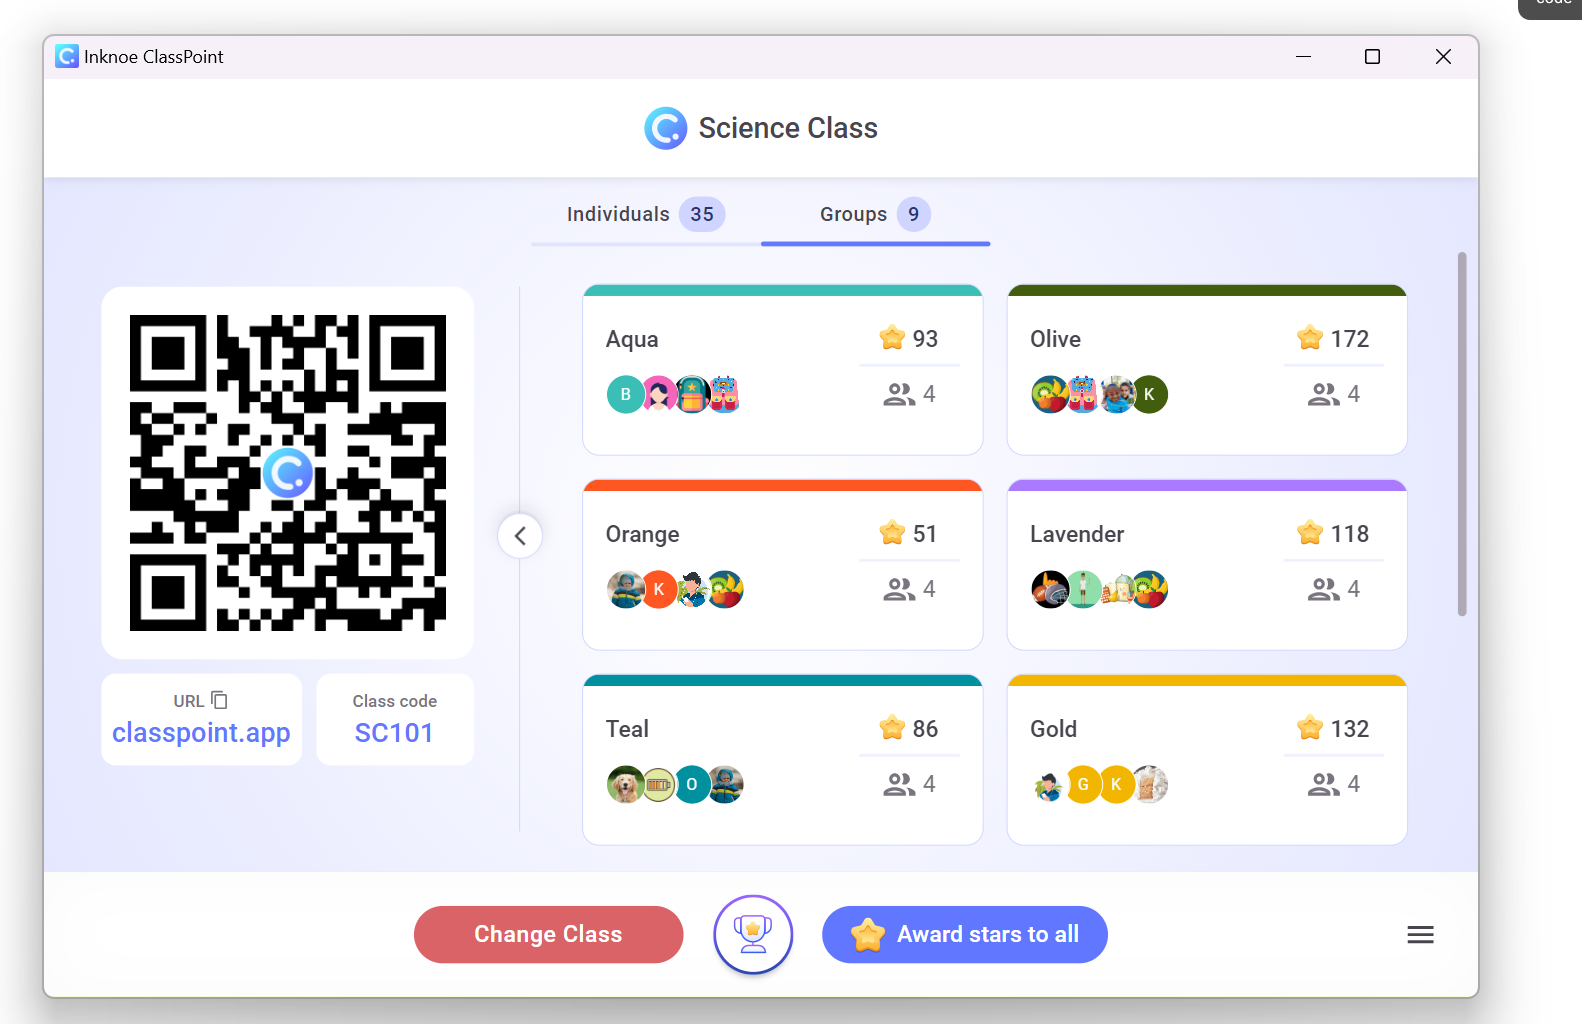
Utilize your saved class to organize students into breakout groups manually or allow ClassPoint to automatically assign students into groups using ClassPoint’s Grouping feature.
How to Group Students using Grouping Feature:
- Access the My Class window from your ClassPoint profile.
- Select “Add New Group”.
- Add students manually to different groups, or enable “Automate Grouping” to allow random group allocation.
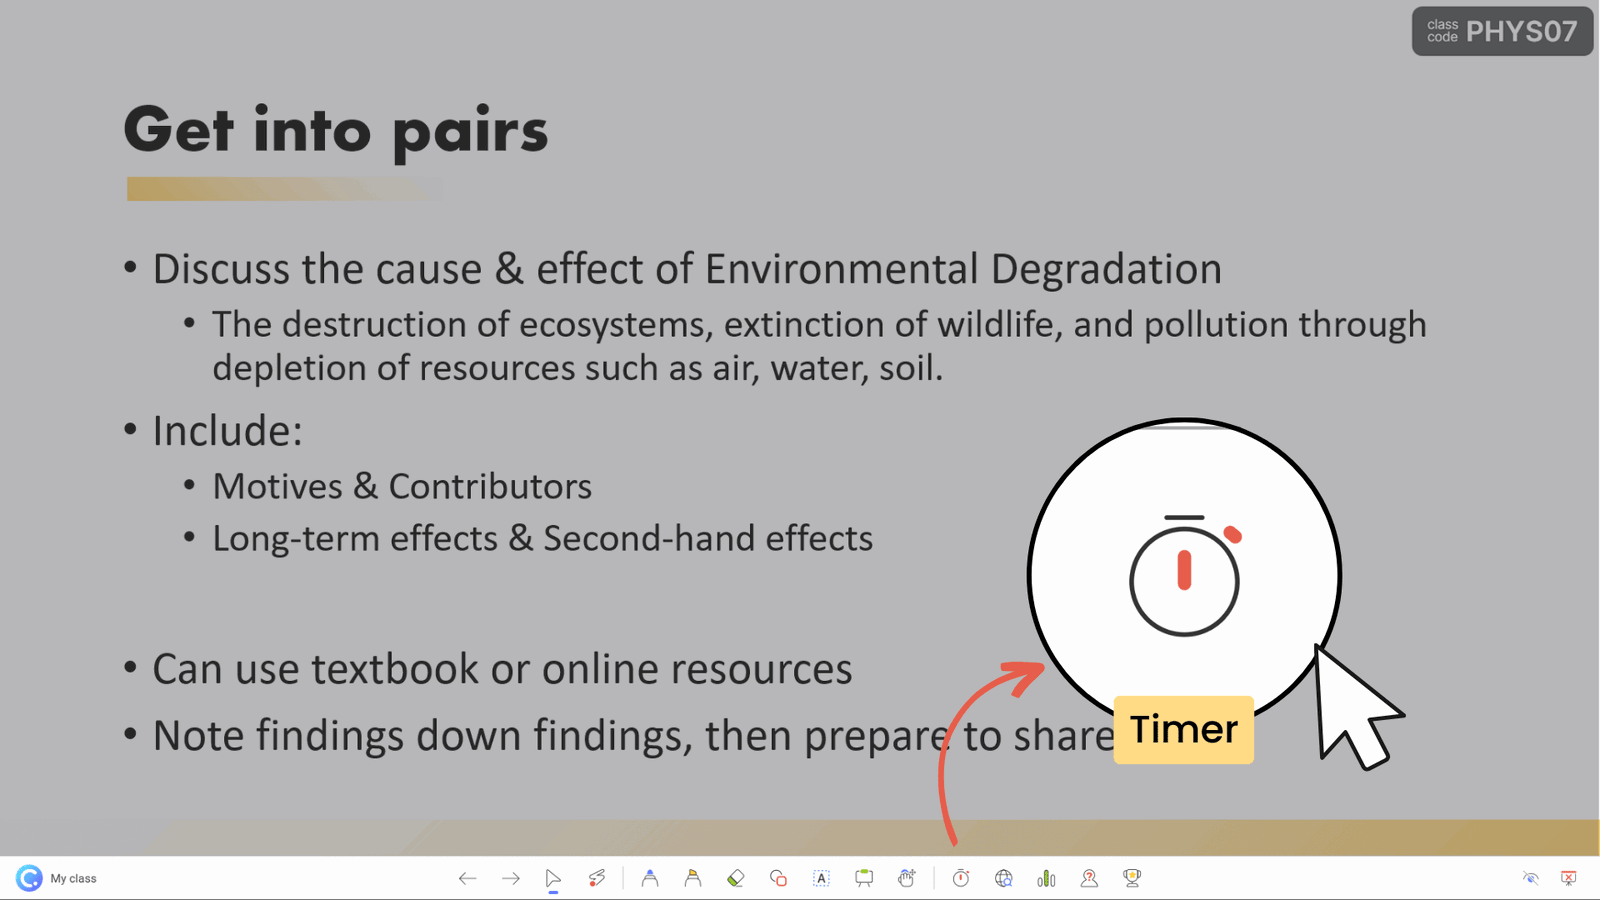
Manage Time Effectively
Access the ClassPoint Timer on the toolbar so that you don’t need to switch back and forth between tools. The timer can be made a full screen for a true break in the presentation or made smaller to showcase your whole slide if you are running a group activity, giving students time to work on a problem, or using one of these other examples.
Next, efficiently manage group discussions during class by utilizing the ClassPoint Timer, ensuring focused and dynamic pacing within the class.
How to access a Timer in PowerPoint:
- Access ClassPoint Timer directly from your bottom toolbar during slide show mode.
- Display the Timer either in full screen for a dedicated break or minimise the window to showcase your whole slide during group activities, providing students with dedicated time for problem-solving or various other activities.
- Set the time.
- Alternatively, use it as a Stopwatch for precise timing during activities or discussions.
Explore 10 effective ways to use a Timer in the classroom, as well as 4 different ways to add a PowerPoint timer to your presentation.
Gamifying Your Class with ClassPoint
Now that you know how you can add interactivity to your PowerPoint slides, it is time to enhance your lessons by introducing gamification, adding diversity and a touch of healthy competition to your classroom. Elevate the learning experience with interactive challenges, quizzes, and games designed to captivate your students’ attention, transforming education into an exhilarating adventure.
Adding Gamified Elements to Class
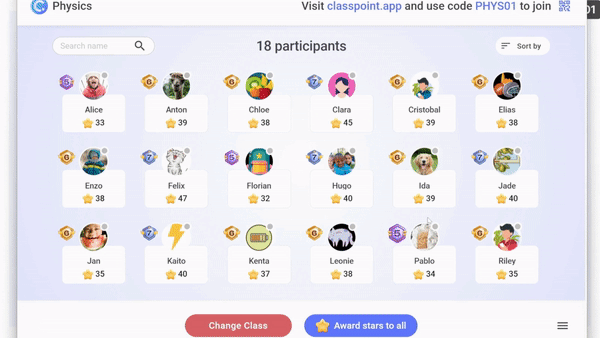
Add gamification elements through ClassPoint, like stars, levels, and a leaderboard to your lesson to encourage student progress through positive reinforcement and a little competition.
Award Stars
The first step to keeping your students more invested in their learning is through awarding points, or in our case, stars. Stars can be awarded for participation, desirable classroom behaviors, correct answers, you name it.
3 Ways to Award Stars to Students:
- Award stars to students through accessing the My Class window at the top right or bottom left corner of your presentation during slide show.
- Alternatively, access the Name Picker icon at the bottom toolbar to award stars to students if they have answered a question correctly after being selected to answer a question.
- You can also award stars to students once they have participated in the interactive quizzes you created via the Interactive Quiz Window during slide show mode.
Levels and Badges
As students accumulate stars, they progress through levels and earn new badges. These levels serve as rewards for their achievements and the knowledge they’ve gained. ClassPoint’s levels are customizable, allowing you to tailor them to suit your classroom’s gamification objectives.
How to Customise Levels and Badges:
- Under your ClassPoint User Profile, add up to 10 levels and adjust the number of points associated with each level.
Pro Tip: Upon reaching a new level, consider offering rewards such as 5 extra credits when students achieve a specific milestone, like reaching level 8. The gamified classroom allows you the flexibility to personalize rewards that benefit both you and your students in a way that suits your teaching style and their learning journey.
Leaderboards
Add the finishing touch to your gamification strategy by displaying the leaderboard to your class! Showcase the leaderboard to inspire and incentivize students to continue earning points and advancing, similar to progressing through levels in a game. You have the flexibility to reveal the leaderboard at any point during your lesson, at the day’s end, or at broader intervals like the quarter, semester, or year.
ClassPoint offers two types of leaderboards: one displaying rankings for the current session and another showcasing comprehensive rankings across all instances you’ve utilized that saved class.
How to Access Leaderboards:
- You can access the leaderboard by clicking on the trophy icon at the bottom toolbar during slide show mode.
- Switch effortlessly between “Total Stars Rank” or “Current Class Rank” to show the points or stars accrued either for the specific class or the cumulative total earned.
Game-Based Learning
Game-based learning goes beyond gamification, offering a fully immersive teaching experience through classroom games. With ClassPoint, crafting these games using PowerPoint has become simpler than ever. Whether it’s a quiz-show-style competition or a team-based game, students will be enthusiastic to engage and demonstrate their knowledge.
10 Fun Classroom Games to Try in Your Upcoming Lesson:
- Jeopardy-style Quiz:
- Create a Jeopardy-style quiz featuring various categories and point values. Allow students to select categories and reveal questions, using ClassPoint’s Short Answer for their responses.
- Trivia Challenge:
- Design a trivia challenge centered around the lesson content. Divide the class into teams and employ ClassPoint’s gamification tools to track scores, fostering a competitive atmosphere that encourages active participation and knowledge retention.
- Escape Room Puzzle:
- Construct an escape room-style challenge where students solve lesson-related puzzles to ‘escape.’ Utilize a combination of hyperlinks guiding to new slides for solving puzzles and ClassPoint’s Draggable Objects to unveil information.
- Interactive Scavenger Hunt:
- Conceal information throughout your presentation, prompting students to locate it by answering questions or solving problems. Incorporate clickable links or ClassPoint’s draggable objects to reveal hidden details.
- Interactive Crossword Puzzle:
- Integrate an interactive crossword puzzle into your PowerPoint presentation, allowing students to use the Slide Drawing Question to complete the puzzle. This reinforces vocabulary and key terms.
- Who Wants to Be a Millionaire:
- Adapt the popular game show into a classroom quiz format. Employ ClassPoint to set up multiple-choice questions, engaging students in a competitive scenario with escalating point values.
- Sorting and Matching Games:
- Create drag-and-drop activities where students match terms with their definitions, historical events with dates, or images with descriptions. This interactive format promotes hands-on learning.
- Interactive Storytelling:
- Transform your lesson into an interactive story where students’ choices impact the narrative. Use clickable links, enabling students to determine the story’s direction based on their comprehension of the material.
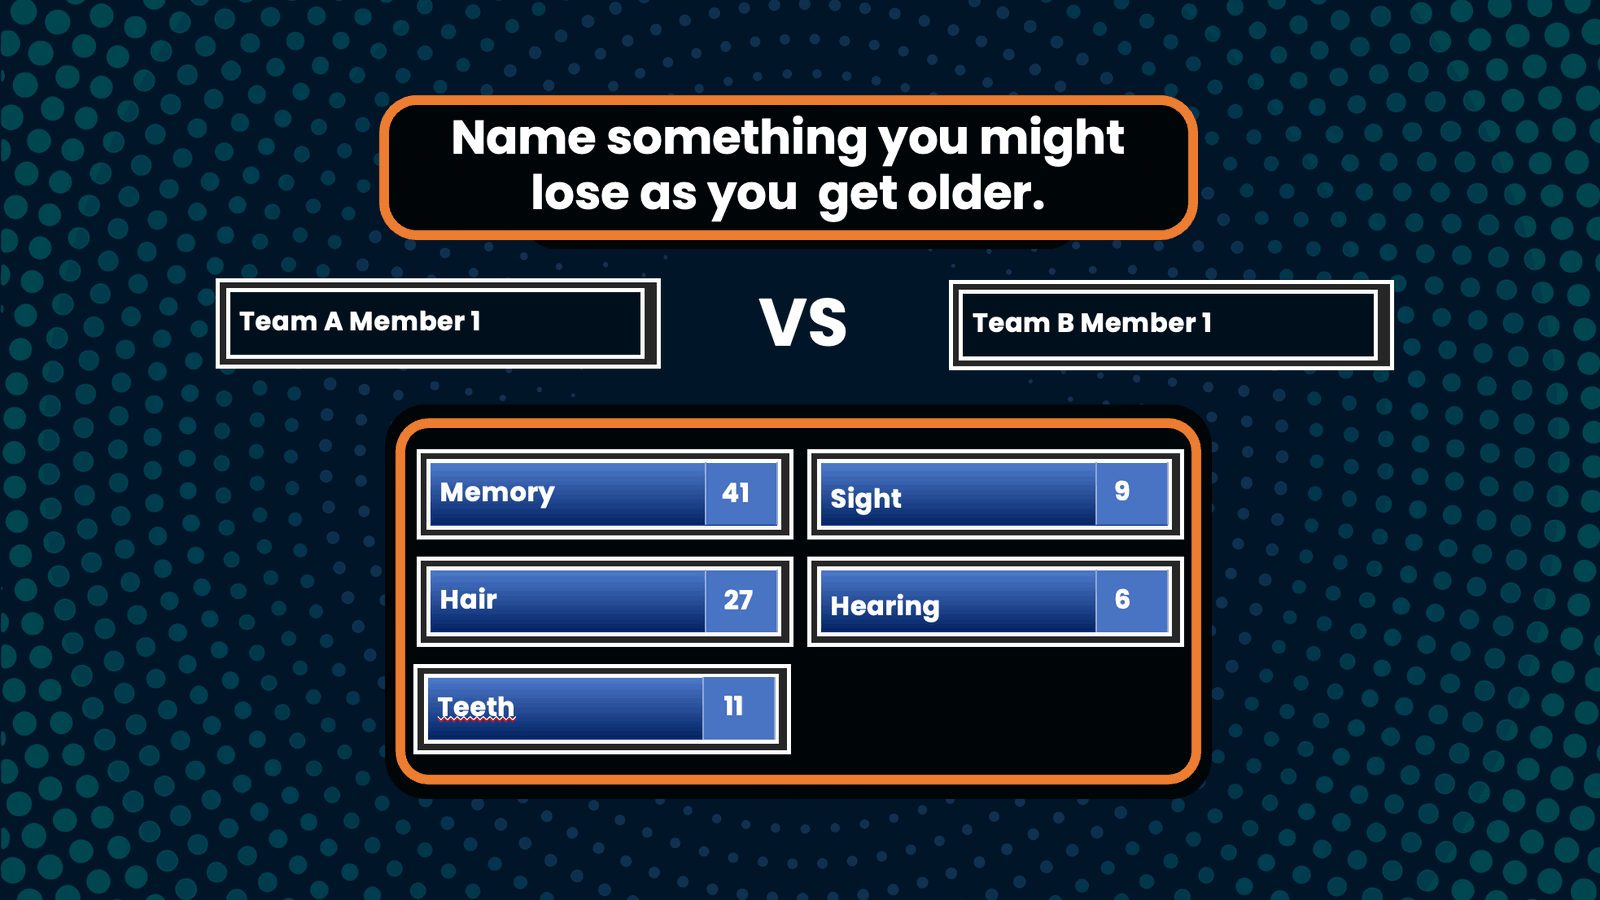
- Family Feud Game:
- Develop a Family Feud-style game, pitting teams against each other to answer survey-based questions, using ClassPoint’s gamification to track points and engage in lively competition.
- Wheel of Fortune Game:
- Create a Wheel of Fortune-style game where students solve word puzzles, utilizing ClassPoint’s Draggable Objects, Gamification tools and Name Picker for interactive features and fostering a fun and challenging learning environment.
Assessment and Revision with ClassPoint
Next, incorporating assessments within your lesson offers valuable insights, enabling adjustments for subsequent periods or immediate adaptations. With ClassPoint’s interactive questions, the array of formative assessment questions allows you to gauge student understanding in real-time. Plus, post-class analysis of collected data provides further insights for a comprehensive evaluation.
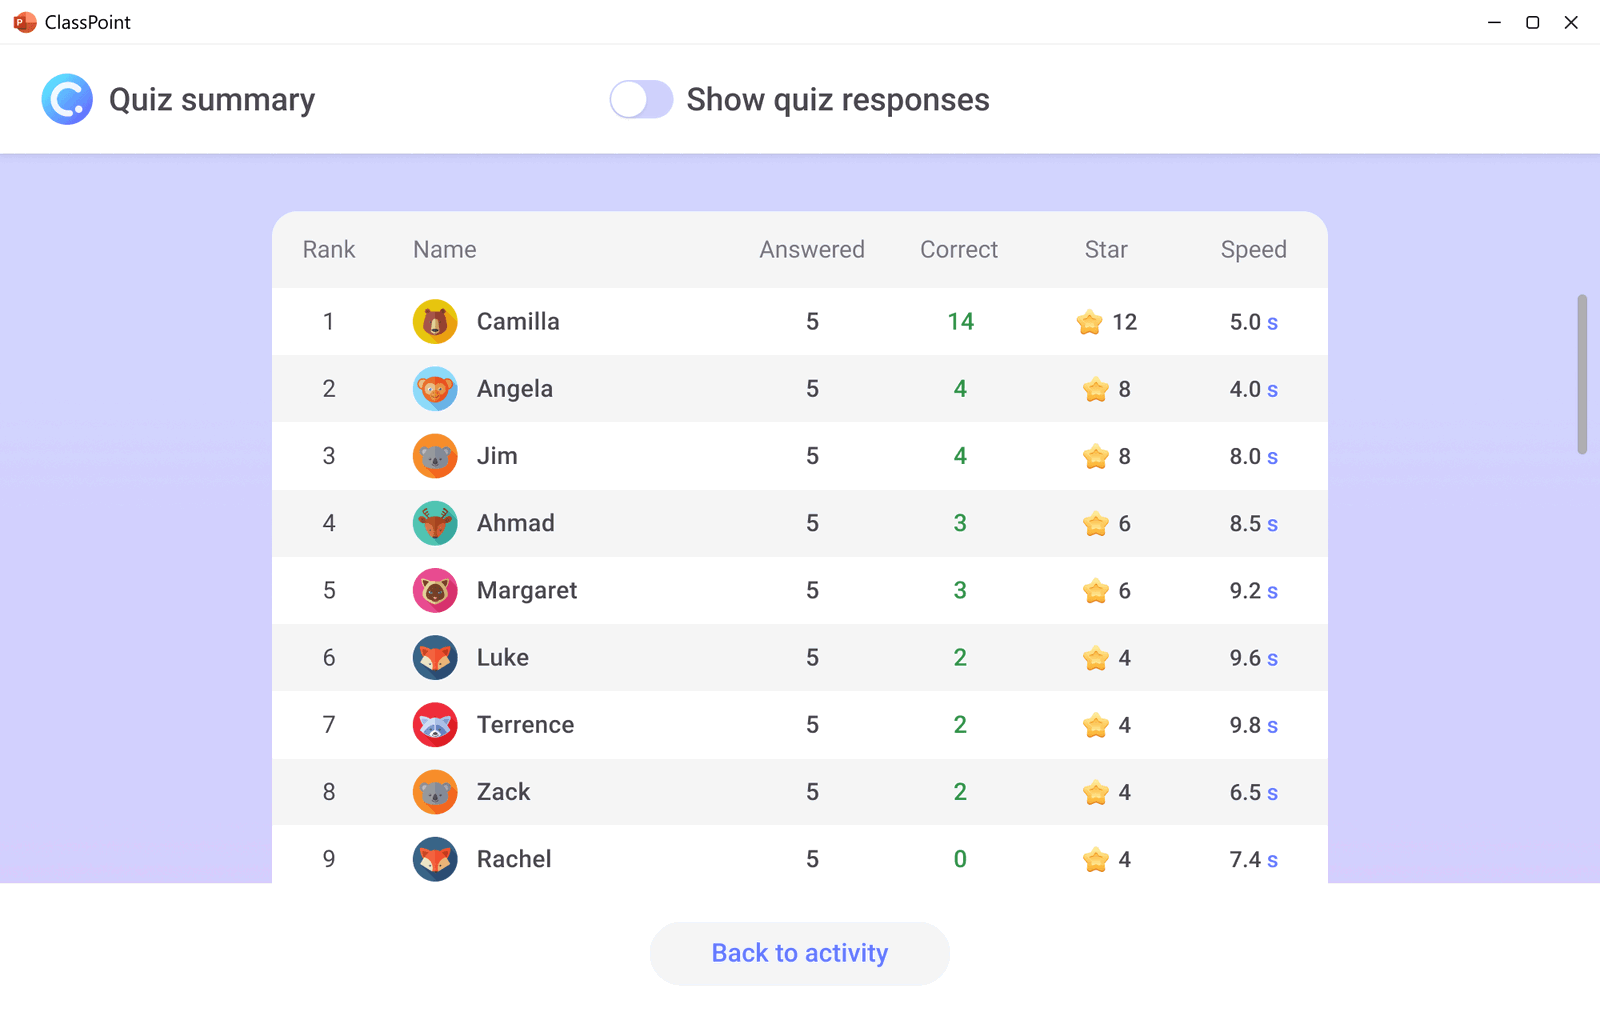
Assess and Automate Grading with Quiz Mode
Creating formative assessment is easier than ever with ClassPoint. Elevate your assessments by utilizing Quiz Mode, an advanced assessment feature that automatically rewards students with stars for correct answers, providing teachers with comprehensive data for analysis.
How to Create Automatically Graded Questions in PowerPoint:
- To create a Quiz Mode question, start by adding a Multiple Choice Question button via ClassPoint tab within your PowerPoint ribbon together with the answer choices to your PowerPoint slide.
- Then, customize the question details in the Side Panel. This includes specifying the number of choices, identifying the correct answer(s), and activating Quiz Mode.
- Upon activation, set the difficulty level, correlating to the number of stars students will earn.
- Post-questioning, review the results through two distinct tables or export the report as an Excel file for seamless integration and easy review within your Learning Management System (LMS).
Explore a variety of Math formative assessment question types in your Math lesson.
Creating A Culturally Responsive Classroom with ClassPoint
Throughout your lessons, it is also important prioritize the creation of a culturally responsive classroom. Embrace diverse cultural backgrounds, integrate various cultural norms into the learning environment, and encourage students to share and celebrate their own cultural identities openly. This approach not only better prepares students for life beyond school but also cultivates deeper connections among peers, fostering an inclusive and supportive classroom environment.
Try the Following Methods to Build A Culturally Responsive Classroom:
Showcase Cultures & Perspectives through the Web
Utilize ClassPoint’s Embedded Browser feature accessible from the toolbar to seamlessly explore diverse cultures through videos, images, and various web pages without exiting your presentation.
How to Embed Live Website in PowerPoint:
- Access the Embedded Bowser icon at the bottom ClassPoint toolbar during slide show mode.
- Search the web as usual. You can also bookmark or pin your favourite sites for easier access in the future.
- You have the option to insert the webpage your browsed as a slide in your PowerPoint for further annotation or discussion.
For instance, during discussions on historical or contemporary events, incorporate multiple perspectives by showcasing narratives and primary sources from various groups. Try exploring facinghistory.org to delve into diverse narratives and primary sources, fostering a richer understanding of various viewpoints.

Learn more about adding a live website to any PowerPoint presentation.
Navigating Diversity with Visuals
Visual aids play a pivotal role in cultivating a culturally responsive classroom, offering a visual vocabulary that resonates with the diverse backgrounds of students. This approach promotes inclusivity and nurtures a deeper understanding and respect for the richness of global cultures.
ClassPoint’s versatile support for various visual aids, including images and videos, empowers you to seamlessly integrate cultural diversity into your presentations. Whether highlighting traditional art, historical landmarks, or contemporary cultural events, utilizing the Video Upload or Image Upload question type enables students to contribute their own media. This collective sharing allows the entire class to explore and appreciate the differences and similarities among diverse cultures.
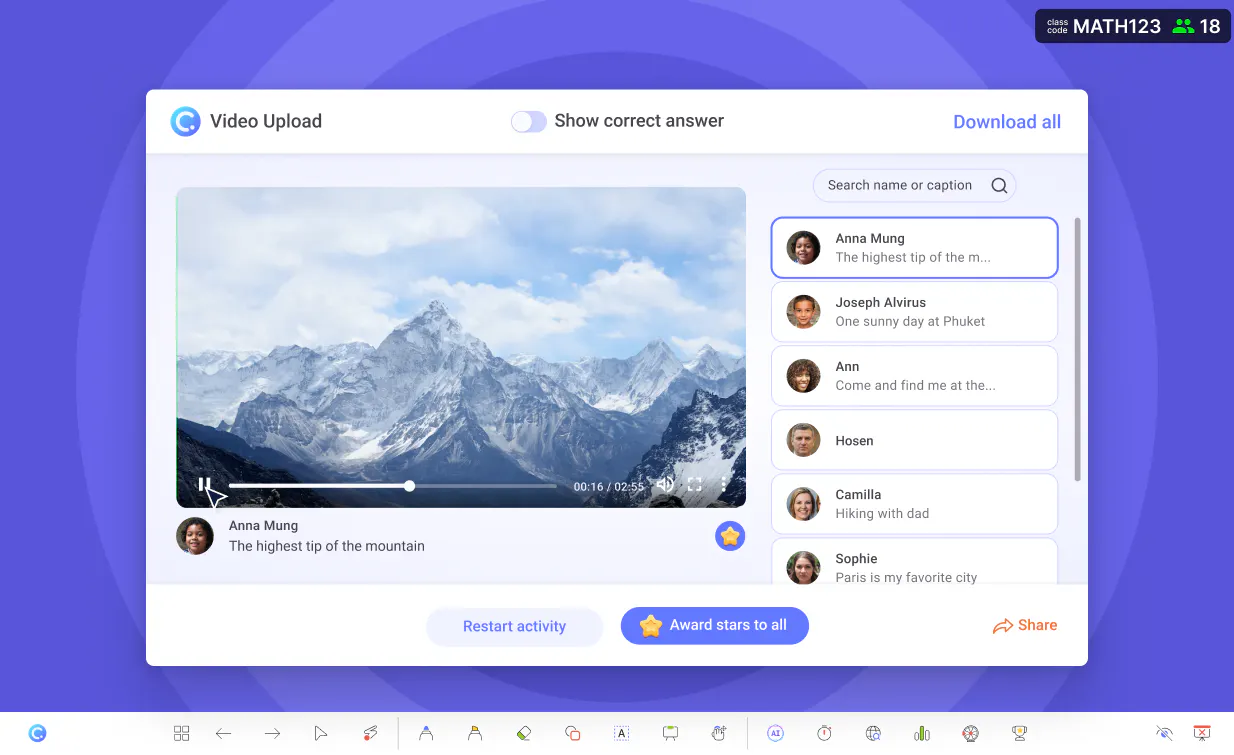
Add videos to PowerPoint and use the Image Upload question to bring these visuals to class!
Post-Lesson Evaluation and Reflection with ClassPoint
ClassPoint’s usefulness doesn’t stop as your class concludes. ClassPoint remains a valuable tool for assessment, reflection, and sharing lesson materials.
Exit Tickets
Gather feedback and assess student comprehension before dismissing the class to make informed decisions for future lessons.
Utilize ClassPoint’s interactive quizzes to pre-set questions or opt for the Quick Poll feature for on-the-spot data.
How to Run Quick Poll in PowerPoint:
- Access the Quick Poll icon on the toolbar and choose from preset templates for feedback, True/False, or Yes/No/Unsure queries.
- Student can answer the poll live via classspoint.app using their devices.
Students can swiftly respond before heading to their next classes. Save these results as a slide in your presentation for later review.
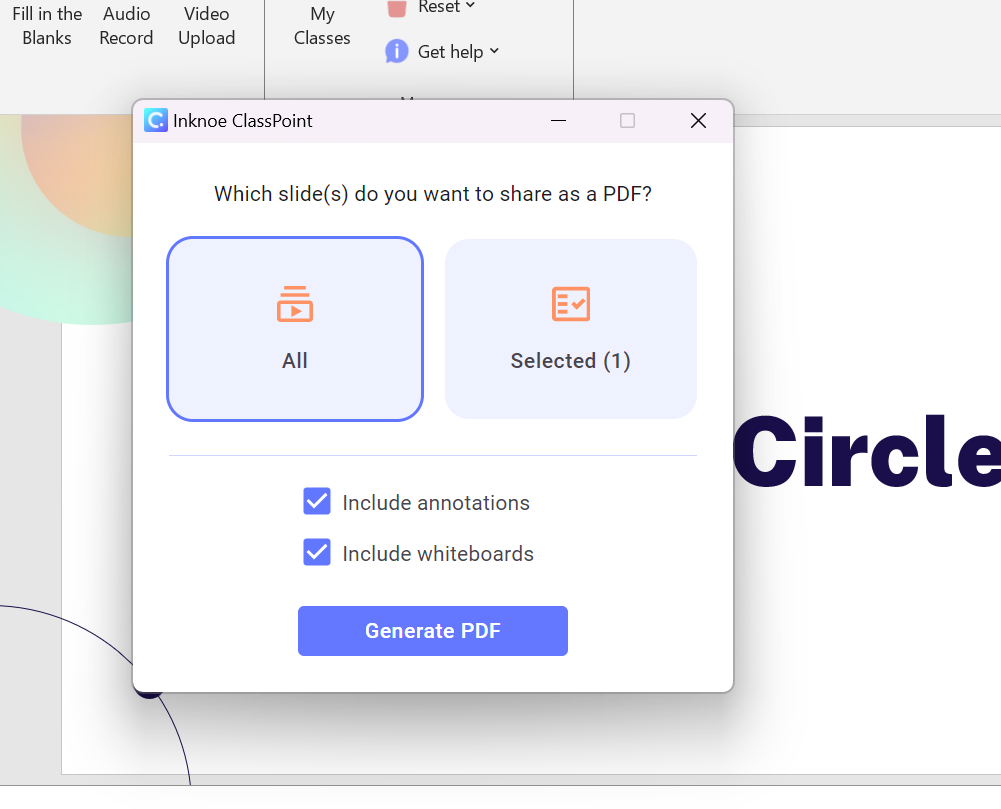
Share and Save as a PDF
Once your lesson is complete, don’t lose all the information or quiz responses that is stored inside. Preserve the annotations, quiz results, and whiteboard pages and share them with your students or keep it for your own records by converting the file into a PDF format using ClassPoint’s SharePDF feature.
How to Convert PowerPoint to PDF:
- Navigate to the ClassPoint tab, access the More Features section, and click on the Share PDF icon.
- Choose to include all annotations and whiteboard pages or select specific slides for sharing.
That’s it! This streamlined process enables students to promptly receive and download the PowerPoint as a PDF, ensuring easy access to study materials whenever needed, without the hassle of collecting emails or subsequent distribution.
Pro Tip: Flip the classroom and share your PowerPoint slides as a PDF with your students before class so you can dive straight into teaching during the lesson without spending time on slide presentation.
Review and Reflect
One final step – conclude your lesson with a thorough analysis of performance data to spot trends and refine your instructional approach for enhanced effectiveness in future sessions.
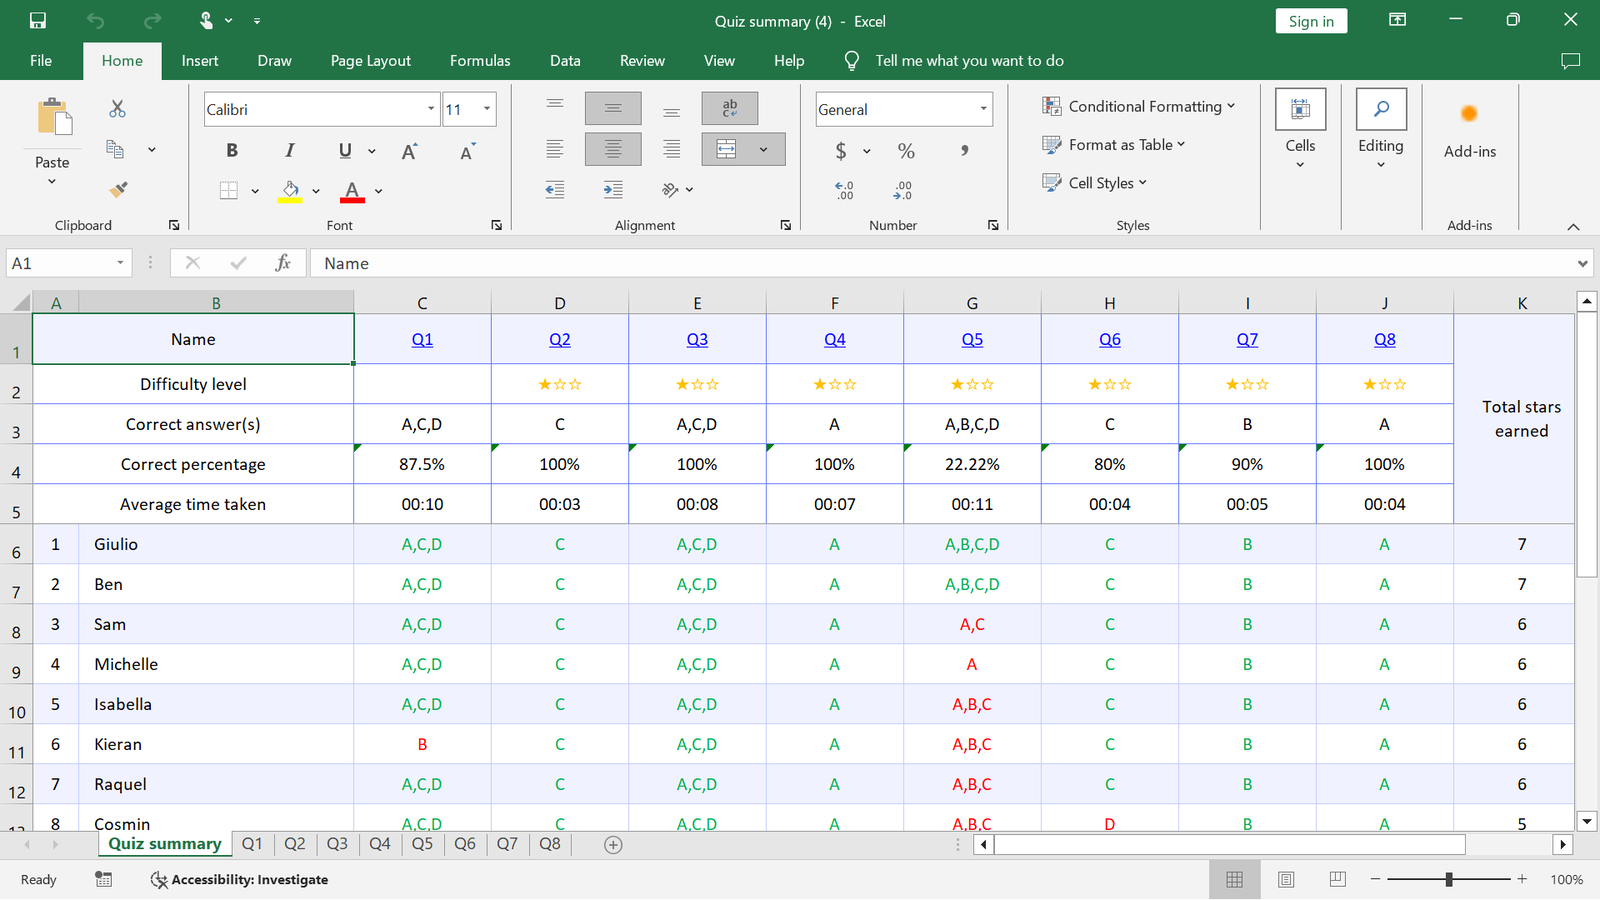
Begin by reviewing quiz responses in PowerPoint Edit Mode by selecting “Quiz Summary” in your PowerPoint ribbon. For presentations with Quiz Mode questions, you can export the results as an Excel file for easy review and integration into any Learning Management System (LMS).
Final Thoughts
Thank you for joining us on this journey through creating a lesson with ClassPoint! As you incorporate these engaging and interactive features into your PowerPoint presentations and lessons, we hope your classroom evolves into a hub of inspiration, collaboration, and transformative learning.
Each lesson holds the potential for growth and connection, so streamline your teaching experience and make the most of every moment in class! Begin crafting your own lesson by signing up for a free ClassPoint account now!
